We are supported by our audience. When you purchase through links on our site, we may earn an affiliate commission, at no extra cost for you. Learn more. Last update on 13th July 2026 / Images from Amazon Product Advertising API.
You can strip paint from miniatures affordably using 99% isopropyl alcohol, which costs about $3 per bottle at drug stores. Soak your plastic or metal miniatures for 30-40 minutes, then scrub with a toothbrush to remove loosened acrylic paint. For stubborn areas, use toothpicks to clean crevices. Simple Green offers an alternative budget option requiring 24-hour soaks. Always wear gloves and work in ventilated areas for safety. Advanced techniques maximize your stripping efficiency and solvent reuse.
Notable Insights
- Use isopropyl alcohol (90-99%) as a cost-effective paint stripper available at most drug stores.
- Soak miniatures for 30-40 minutes, then scrub with a toothbrush to remove loosened paint layers.
- Buy solvents in bulk and batch process multiple miniatures to maximize efficiency and reduce costs.
- Wear chemical-resistant gloves and work in well-ventilated areas for safe paint stripping operations.
- Reuse old miniatures by stripping paint instead of purchasing new models to save money.
Choosing Budget-Friendly Paint Stripping Materials
When stripping paint from miniatures on a budget, you’ll find that common household and hardware store chemicals often perform just as well as expensive specialty products. Isopropyl alcohol at 90-99% concentration ranks as the most cost-effective option, available at drug stores for considerably less than specialty miniature strippers.
Methylated spirits provide excellent budget alternatives, offering similar performance at even lower costs despite stronger odor.
Simple Green and Purple Power represent affordable household degreasers that strip paint with variable effectiveness. Cost comparisons show nail polish remover works for specific paint types but risks plastic damage. Brake fluid strips effectively but requires extra safety precautions. IPA stands out because it removes paint without leaving a greasy residue that other chemicals may leave behind. These budget options work effectively on metal, plastic, resin miniatures regardless of the material composition. Water-based strippers offer safer alternatives for indoor use with minimal odor compared to traditional solvent-based options.
These readily available chemicals deliver professional results while keeping your miniature restoration budget manageable and your wallet intact. For comparison, specialized products like AK Interactive Paint Stripper offer professional-grade performance but at higher costs than household alternatives.
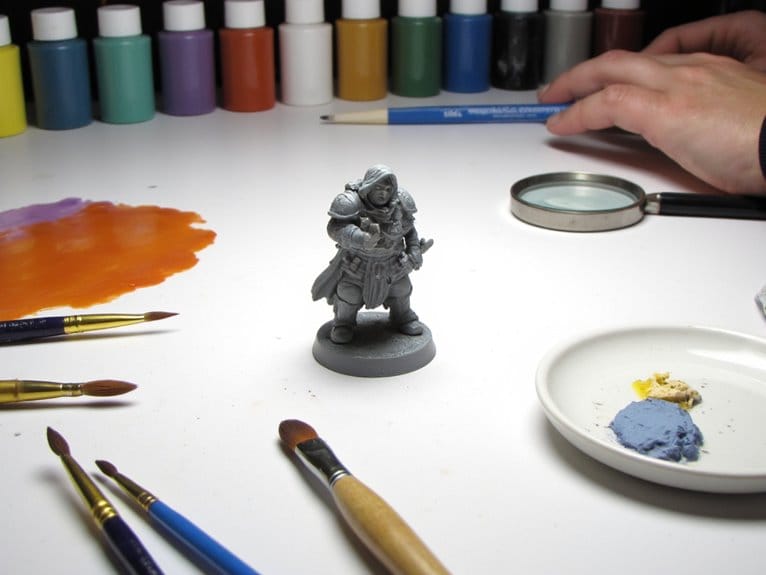
Preparing Your Miniatures for Soaking
Before you can strip paint effectively, you’ll need to select the right solvent and prepare proper containers for the soaking process.
Your choice of stripping agent-whether isopropyl alcohol, commercial paint strippers, or specialty miniature solutions-will determine both your setup requirements and safety protocols. For those in the UK, dark brown liquid Dettol antiseptic has gained popularity as an effective and readily available option that often outperforms traditional alternatives.
The container system you establish must accommodate full submersion while maintaining chemical compatibility and preventing evaporation during the extended soaking periods. When working with hard plastic miniatures like those from Wargames Atlantic sets, you’ll want to ensure your chosen stripping method is gentle enough to preserve the detailed sculpting while effectively removing multiple paint layers.
Choosing Your Stripping Solvent
Consider your workspace ventilation when selecting solvents.
Low-toxicity options like isopropanol require minimal ventilation, while acetone demands adequate airflow.
Balance cost, effectiveness, and safety for ideal results.
Setting Up Containers
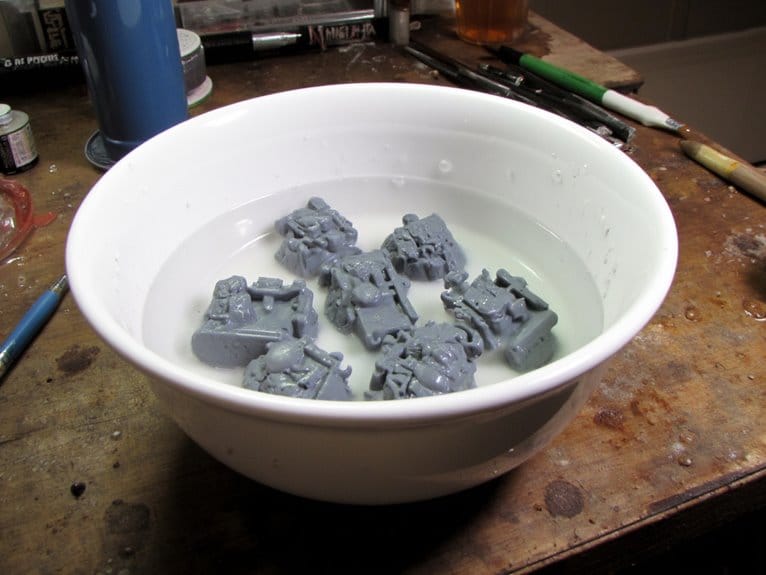
After you’ve selected your stripping solvent, proper container setup becomes essential for achieving consistent paint removal across all your miniatures.
Choose containers large enough to fully submerge each piece without crowding. Plastic or glass container types work best as they won’t react with solvents like isopropyl alcohol or Biostrip 20.
Use shallow trays for small batches, but deeper vessels accommodate multiple miniatures effectively.
Position containers on protected surfaces since paint chips will accumulate. Clean miniatures of debris before placement to maximize solvent contact.
Remove detachable bases when possible for better access.
Fill with enough solvent to completely cover all pieces.
Proper sealing methods include airtight lids that prevent evaporation and contain fumes.
Gently agitate containers to eliminate air bubbles before sealing.
Optimal Soaking Times and Techniques
When stripping paint from miniatures, soaking duration depends heavily on your choice of solvent and the miniature’s material composition. Isopropyl alcohol delivers ideal soak durations of 30-40 minutes for most applications. This timeframe guarantees effective paint removal while protecting your miniature’s integrity.
Metal miniatures require shorter soaking periods due to their surface properties. Plastic and resin models need extended exposure times.
Simple Green offers gentler action but demands longer soaks-up to 24 hours for complete paint dissolution.
Cover your container to prevent solvent evaporation during extended soaking. Monitor resin miniatures closely when using aggressive chemicals like Biostrip, which can cause material damage overnight.
After soaking, scrub with soft-bristled brushes while dipping tools in the same solvent for enhanced removal efficiency. For detailed paint removal work, use synthetic bristles that resist shedding and maintain their shape throughout the cleaning process. Professional airbrush cleaners can also effectively remove stubborn acrylic paint residue from intricate miniature details.
Essential Tools for Effective Paint Removal
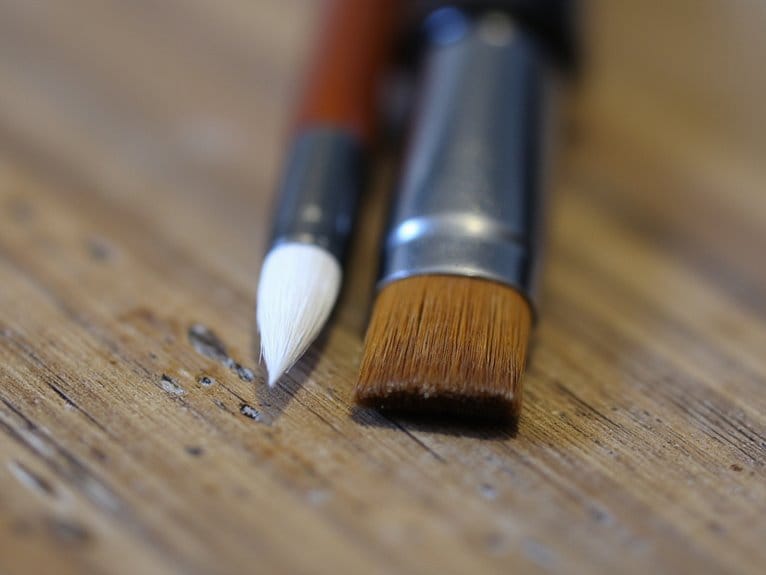
Four categories of specialized tools transform paint stripping from a frustrating ordeal into a controlled, efficient process. Your brush selection determines success: plastic bristles work on soft acrylics, copper handles medium paints, and stainless steel tackles stubborn enamels. Old toothbrushes excel at detailed work while kitchen scrub brushes handle rough surfaces.
Container options greatly impact efficiency. Choose lidded plastic vessels large enough for full submersion without overflow. Large mixing bowls accommodate batch processing while preventing evaporation of volatile strippers like 99.9% isopropyl alcohol. Small dice trays can serve as excellent containers for soaking individual miniatures during paint removal.
Essential accessories include modeling knives for scraping stubborn flakes, protective gloves for chemical handling, and cocktail sticks for crevice work. Paper towels protect surfaces while nearby water access enables immediate rinsing. Regular cleaning of fine tips is crucial to avoid clogs during use when working with precision tools.
Maintain dedicated tools separately and replace brushes regularly as they accumulate paint residue. Consider keeping precision applicator tips nearby for applying targeted paint strippers to specific areas without affecting surrounding details. Professional brush cleaners can help restore your tools between stripping sessions and extend their usable lifespan significantly.
Safety Precautions and Workspace Setup
Proper safety protocols protect both you and your miniatures from the hazards inherent in chemical paint removal. Chemical safety begins with proper personal protective equipment. Wear chemical-resistant gloves made from neoprene, latex, or nitrile to prevent skin contact with stripping agents. Safety goggles protect your eyes from splashes during application.
| Safety Equipment | Purpose |
|---|---|
| Chemical-resistant gloves | Prevent skin irritation from solvents |
| Safety goggles | Shield eyes from splashes |
| Respiratory mask | Block harmful fumes indoors |
| Absorbent materials | Catch spills and paint chips |
Workspace organization requires adequate ventilation. Set up operations in well-ventilated areas like garages or outdoor spaces. Cover work surfaces with disposable materials and prepare dedicated containers for stripping solutions and soapy rinse water.
Money-Saving Strategies for Multiple Projects
Since miniature painting projects can quickly drain your budget, implementing cost-reduction strategies becomes essential for long-term hobby sustainability.
Purchase paint and solvents in larger quantities to achieve bulk paint savings when planning multiple projects. Economy acrylic paint sets from art supply stores offer high pigment density at reduced per-unit costs.
Efficient project planning involves batch processing multiple miniatures simultaneously. Strip, wash, and repaint in organized stages to maximize solvent efficiency and reduce material waste.
Utilize multipurpose products like isopropyl alcohol for both stripping and cleaning brushes. Clean brushes immediately after use with warm soapy water to maintain their performance and extend their lifespan.
Salvage old miniatures through stripping rather than purchasing new models. Reuse containers and brushes by maintaining them properly between projects.
Organize your workspace to minimize paint and solvent wastage while processing multiple pieces simultaneously.
Consider investing in a budget resin printer to create your own miniatures for stripping practice, allowing you to experiment with different techniques without risking valuable purchased models.
Troubleshooting Stubborn Paint and Problem Areas
Even with proper preparation and technique, you’ll encounter paint that refuses to budge from your miniatures.
Different paint types create unique challenges requiring specific removal techniques. Old enamel paint bonds aggressively to surfaces, while paint on glued seams resists chemical stripping entirely.
When standard solvents fail, combine mechanical assistance with extended soaking:
- Soak miniatures 20-40 minutes in isopropyl alcohol for deep penetration.
- Scrub with toothbrush to remove loosened paint layers effectively.
- Use toothpicks or files for stubborn crevices and bonded areas.
- Repeat soak-scrub cycles to gradually weaken persistent residues.
Accept that some paint residues may never fully disappear.
Hidden spots under parts won’t affect your final appearance. When complete removal proves impossible, repainting over residual areas becomes your most practical solution. Quality acrylic paints with excellent adherence properties will bond well even over minor paint residues, making your restoration project successful.
After successfully restoring your miniatures, applying a protective matte varnish will prevent future damage and preserve your new paint work from scratches and wear. When applying new paint, using flow improvers can help achieve better coverage and smoother application over previously stripped areas.
For your next painting project, selecting the right paint thinner beforehand will help prevent future stripping challenges by ensuring proper adhesion and finish quality from the start.
Maximizing Solvent Reuse and Efficiency
You can considerably extend your solvent’s working life by filtering out paint debris that accumulates during the stripping process.
Paint particles and pigment residue quickly saturate fresh solvent, reducing its effectiveness and forcing you to replace it more frequently than necessary.
Implementing a systematic debris removal strategy will keep your solvent cleaner longer, reducing material costs while maintaining consistent paint removal performance across multiple miniature projects.
Filtering Paint Debris Out
Paint debris floating in used solvent doesn’t mean you need to discard the entire solution. Solvent filtration allows you to recover clean thinner for multiple stripping sessions, reducing costs markedly.
Allow contaminated solvent to sit sealed for several weeks. Paint particles will settle naturally into sediment at the bottom. Carefully decant the clear liquid on top into a clean glass jar for reuse.
For faster results, filter the solution through these materials:
- Coffee filters for fine particle removal
- Microfiber cloths for medium filtration
- Fine mesh strainers for initial debris separation
- Multiple filtration layers for maximum clarity
Avoid agitation during settling to maintain clear separation between clean solvent and paint debris.
Store filtered solvent in labeled containers away from heat sources.
Extending Solvent Lifespan
Three critical factors determine how long your stripping solvents remain effective: contamination control, storage conditions, and usage patterns.
Keep dirt, paint residues, and dust out of your solvent containers. Use dedicated containers to prevent cross-contamination from other chemicals.
Proper solvent storage extends lifespan considerably. Store solvents in airtight containers within cool, dark environments. UV light and heat accelerate chemical breakdown.
Use small containers matching your consumption rates to minimize air exposure. Label containers with opening dates to track solvent age.
Implement solvent recovery techniques by allowing paint debris to settle, then decant clear solvent for reuse. Use fresh solvent for initial cleaning stages and reserve recovered solvent for subsequent cleaning.
Monitor clarity and smell as saturation indicators requiring replacement.
Final Cleaning and Miniature Restoration
Most restoration projects require careful attention to environmental conditions before beginning any cleaning procedures.
You’ll need to maintain relative humidity below 65% to prevent mold growth and substrate deformation.
Paint layer consolidation becomes critical when dealing with flaking or lifting areas on your stripped miniatures.
After stripping, implement these miniature preservation techniques:
- Surface cleaning – Use pH-modified solutions appropriate for delicate materials
- Structural stabilization – Address warping and cracks before paint application
- Paint consolidation – Secure loose paint layers with conservation adhesives
- Protective mounting – Use conservation-grade boards to minimize mechanical stress
Handle your miniatures with clean gloves to avoid oil contamination.
Store them away from direct sunlight to prevent embrittlement.
Proper environmental control guarantees your restoration work remains stable long-term.
When repainting your restored miniatures, consider using epoxy resin pigments for enhanced durability and vibrant color saturation that resists fading over time.
For projects requiring exceptional detail reproduction, water washable resin eliminates the need for isopropyl alcohol cleanup while maintaining minimal volume shrinkage.
On a final note
You’ve now mastered cost-effective paint stripping techniques that’ll save you money on future projects. Remember to reuse your solvents until they’re completely saturated, and always test new products on spare miniatures first. These methods work on both metal and plastic figures when you follow proper soaking times. With practice, you’ll strip paint faster while preserving fine details. Your restored miniatures are ready for primer and fresh paint applications.