We are supported by our audience. When you purchase through links on our site, we may earn an affiliate commission, at no extra cost for you. Learn more. Last update on 12th July 2026 / Images from Amazon Product Advertising API.
You’ll zenithal prime miniatures by first applying matte black primer as your base coat to create shadow depth, then spraying light grey or white primer directly from above at a 6-8 inch distance to simulate natural sunlight. This technique transforms flat surfaces into three-dimensional masterpieces by establishing natural light and shadow placement. Use an airbrush for superior control, guarantee proper ventilation, and maintain temperatures between 59°F-77°F for ideal primer consistency. Master these fundamentals to access advanced lighting effects and professional finishing techniques.
Notable Insights
- Apply matte black primer as base coat to establish deep shadows and create foundation for natural lighting effects.
- Spray light grey or white primer directly from above to simulate sunlight hitting raised surfaces and edges.
- Maintain 6-8 inch distance when spraying to prevent over-saturation and preserve miniature details during application.
- Ensure each primer layer completely dries before applying next coat to avoid unwanted blending and achieve clean transitions.
- Use airbrush for superior control and coverage, though spray cans work with proper distance and technique.
Understanding Zenithal Priming and Its Purpose
What transforms a flat-looking miniature into a three-dimensional masterpiece before you’ve even applied the first coat of paint? Zenithal priming creates this transformation through strategic light simulation techniques.
This technique mimics natural sunlight by applying primer from specific angles. You’ll start with dark primer overall, add grey midtones, then finish with light primer from directly above. The zenithal technique benefits include enhanced contrast, improved detail visibility, and natural shadow placement.
Unlike traditional uniform priming, zenithal priming deliberately layers different values. Dark primer stays in recesses while light primer hits raised surfaces. This creates a tonal roadmap for your painting process.
Zenithal priming maps light and shadow before you paint, creating a instant visual guide for realistic depth and dimension.
The result is immediate depth and dimension that guides your brush placement and reduces shading work later. Beyond visual enhancement, zenithal priming saves time by accomplishing initial basecoat work during the priming step itself. The technique proves particularly effective when using semi-translucent contrast paints that naturally follow the established gradient. For additional depth enhancement while working with foam terrain pieces, consider using hot wire cutters to create precise beveled edges that complement the zenithal lighting effect.
Professional-grade acrylic primers work best for this technique as they provide superior adhesion and maintain fine detail definition across multiple thin layers. Quality primers enable brush and airbrush versatility, allowing painters to choose their preferred application method for optimal control and coverage. Apply primers in ideal temperatures between 55-75°F with humidity below 60% for optimal adhesion and drying performance.
Essential Materials and Equipment You’ll Need
Success in zenithal priming depends on having the right tools and materials before you begin.
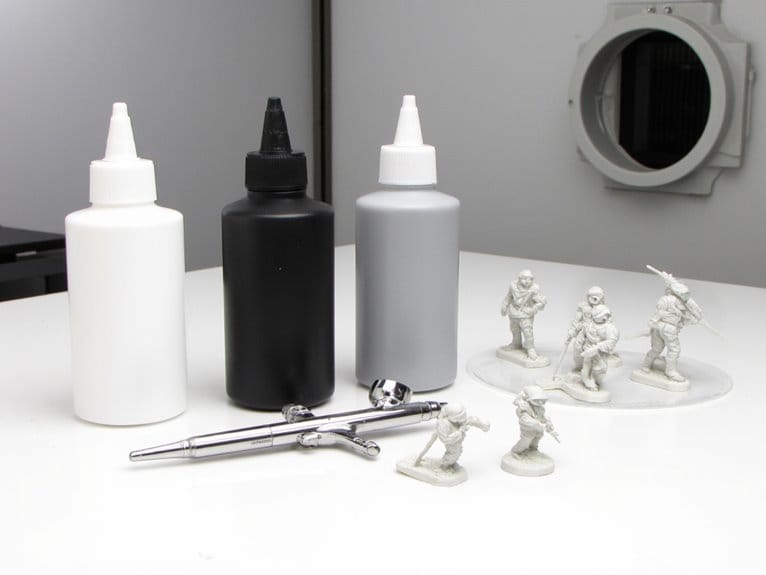
You’ll need two primer types: matte black for base shadows and matte white or light grey for highlights. Select miniature-specific formulations that guarantee proper adhesion and surface texture.
For coating methods, an airbrush delivers superior control over spray angle, distance, and intensity. Professional models like the Iwata Eclipse HP-CS offer dual-action triggers that enable precise paint flow adjustment during application. Spray cans work but require careful positioning to avoid heavy coverage.
Both options need airbrush-friendly formulations for smooth application. Look for paints with particle sizes under 35μm to prevent clogging and ensure consistent spray patterns through your airbrush system. Maintaining proper pressure settings between 15-30 PSI ensures optimal spray patterns for detailed miniature work.
Essential accessories include miniature holders for stability, protective masks and gloves for safety, and a well-ventilated workspace. This technique mimics natural lighting by creating realistic shadows and highlights on your miniatures.
You’ll also need cleaning materials like microfiber cloths, directional lighting to visualize angles, and mild detergent for pre-priming surface preparation. Proper ventilation is crucial when working with primers to ensure a safe workspace environment.
Preparing Your Workspace and Miniatures
Before you apply primer to your miniatures, proper workspace preparation and surface treatment will determine the quality of your final results.
Select a well-ventilated area with adequate lighting-natural light or bright lamps work best. A quality magnifying lamp with adjustable brightness levels will significantly reduce eye strain during detailed priming work. For optimal illumination, ensure your LED lighting system produces at least 2000 lumens to maintain clear visibility of fine details during the priming process. Cover your work surface with disposable paper to catch overspray and maintain workspace cleanliness throughout the process.
Proper lighting and ventilation create the foundation for professional priming results while protecting your workspace from contamination.
Complete miniature assembly first, removing all mold lines and flash. Wash your models with mild detergent to eliminate oils and release agents that prevent primer adhesion. A handheld magnifying glass with at least 10X magnification can help you identify remaining mold lines and surface imperfections that require attention before priming.
Dry them completely before proceeding. Secure miniatures using holders or handles to avoid direct contact during application.
Position models at eye level, maintaining 6-8 inches distance from your spray source. Keep primer cans at 15-25°C and shake vigorously for two minutes.
Always test spray patterns on disposable material first. Consider using alligator clip stands to provide secure holding for small parts while maintaining hands-free maneuvering during the priming process.
Applying the Dark Base Primer Layer
Since your miniatures are now clean and secured, you’ll begin the zenithal priming process by establishing a dark foundation that simulates natural shadow depth. Apply matte black primer using multiple thin coats rather than one heavy application. This prevents detail loss while ensuring complete coverage in recesses and undercuts.
| Application Method | Coverage Focus | Drying Time |
|---|---|---|
| Spray primer | Even surface coating | 15-30 minutes |
| Brush application | Detail preservation | 20-45 minutes |
| Airbrush technique | Precision control | 10-20 minutes |
Dark primer benefits include enhanced shadow contrast and improved paint adhesion for subsequent layers. Focus your application techniques on complete recess penetration while maintaining uniform surface coverage. Allow full drying before proceeding to prevent unwanted blending with lighter primer layers.
Adding the Light Primer for Realistic Highlights
After the dark primer has completely cured, you’ll apply light primer from directly overhead to create realistic highlights that mimic natural sunlight.
Position your spray can at a 90-degree angle to the miniature’s surface. Maintain consistent spray distance adjustments of 6-8 inches to prevent over-saturation while ensuring even coverage.
Hold your spray can perpendicular to the surface and maintain 6-8 inches distance for optimal primer coverage without oversaturation.
Select white or light grey primer with proven light color compatibility to your base coat. Games Workshop Corax White offers excellent adhesion properties.
Execute multiple thin passes rather than single heavy applications to preserve sculptural details. Vallejo White Acrylic Surface Primer provides professional-grade adhesion and fast-drying results that maintain fine details on resin surfaces.
Rotate the miniature systematically to catch all raised surfaces while maintaining top-down orientation. This technique establishes natural highlight zones that guide subsequent painting decisions.
The light primer creates depth perception and serves as a foundation for contrast paints and dry brushing techniques. Chemical compatibility between primer and subsequent paint layers is essential for preventing peeling or chipping during the painting process. Focus on paints with good flow consistency to ensure smooth application and minimize interruptions during your painting workflow. Once your priming is complete, consider applying a clear coat to protect the primer layer and provide additional durability before adding base colors.
Advanced Techniques and Creative Variations
While standard zenithal priming uses black-to-white shifts from overhead angles, advanced practitioners can expand this foundation through sophisticated airbrush control and creative color variations.
You can introduce mid-tone colors like blues or warm tans between your base and highlight layers to create richer shifts. Variable air pressure control enables delicate paint flow management for smooth gradients.
Creative lighting effects emerge when you vary spray angles to simulate side lighting or multiple light sources. Apply colored primers selectively on specific miniature sections rather than uniform coverage.
For textured effects, adjust primer opacity based on surface materials-matte finishes require diffused layers while glossy surfaces need sharper highlight edges. You can also employ non-naturalistic colors like warm underlighting for stylized fantasy effects.
When working with multiple primer colors, ensure proper paint mixing between applications to maintain smooth color transitions and prevent inconsistent coverage that could affect your final finish. Adding flow improvers to your primer mixture can prevent airbrush clogging and enhance paint fluidity for more controlled application during complex zenithal work. Master the double-action mechanism which requires coordination of paint flow and air pressure control to achieve the precise gradients essential for professional zenithal results.
Between zenithal sessions, consider using a wet palette to keep your mixed primer colors workable for extended periods and reduce paint waste during complex multi-stage priming work.
Troubleshooting Common Application Problems
Even experienced modelers encounter application problems that compromise zenithal priming results, though most issues stem from controllable factors like primer thickness, environmental conditions, or technique errors.
Thick primer layers obscure fine details and create adhesion problems.
Humidity effects disrupt drying and cause uneven finishes.
Distance control prevents overspray issues while maintaining smooth gradients.
Common troubleshooting solutions include:
- Maintain 6-12 inch spray distance to prevent pooling and reduce overspray issues
- Apply single thin coats rather than multiple heavy layers that obscure detail
- Avoid reworking wet primer to prevent streaking and uneven coverage
- Clear spray nozzles by inverting cans until only propellant emerges
- Control environmental factors including humidity effects, temperature, and airflow
Allow complete drying between coats to prevent layer mixing and maintain proper zenithal contrast.
Post-processing cleanup becomes critical when primer residue affects miniature surfaces, similar to how water washable resins eliminate the need for harsh solvents in 3D printing applications.
For heavily detailed miniatures with intricate recesses, consider using ultrasonic cleaners before priming to ensure all surfaces are free from oils and contaminants that could affect primer adhesion. Operating at frequencies between 40-45kHz, these cleaners effectively remove residue without damaging delicate miniature details.
Some models feature adjustable temperature control from 70-175°F that helps optimize cleaning effectiveness for different types of surface contaminants.
Using Your Zenithal Prime as a Painting Guide
The most effective use of zenithal priming transforms your miniature into a three-dimensional light study that guides every brush stroke. Your black base shadows indicate where darker colors belong.
Grey mid-tones show shifts in areas requiring medium values. White highlights mark surfaces catching maximum light.
This light mapping system eliminates guesswork during color placement. You’ll achieve superior color modulation by following the primer’s natural gradients. Apply your lightest colors over white zones and darkest shades over black areas. The grey shifts guide your mid-tone applications.
Your zenithal base works exceptionally well with contrast paints and glazes, which flow naturally into recesses while highlighting raised details.
Use the white zones as targets for edge highlighting and drybrushing. Shadow areas direct wash applications perfectly, ensuring realistic depth and dimension throughout your painting process.
Pro Tips for Consistent Professional Results
Achieving professional zenithal priming results requires strict control of your workspace environment and spray application techniques.
Temperature fluctuations can destroy your primer’s consistency, while inconsistent spray patterns create uneven coverage that ruins the natural lighting effect you’re trying to achieve.
These two factors alone separate amateur results from professional-quality zenithal priming that enhances your miniature’s visual impact.
Environment and Temperature Control
Why do some zenithal priming sessions produce flawless gradients while others result in splotchy, uneven coverage? The answer lies in proper temperature regulation and humidity management. Environmental factors directly affect spray can performance and paint adhesion.
Optimal conditions require these critical elements:
- Temperature range: Maintain spray cans between 15°C to 25°C (59°F to 77°F) for consistent atomization
- Can warming: Use warm water baths with lids on to prevent moisture contamination
- Humidity control: Deploy dehumidifiers or work indoors to prevent paint bubbling and uneven glossing
- Airflow management: Minimize drafts while ensuring adequate ventilation to disperse fumes
- Lighting setup: Use cool white LED lamps to accurately assess zenithal gradients
- Safety equipment: Always wear half face respirators with appropriate filters when working with primer aerosols to protect against harmful particles and vapors
Avoid priming below 10°C (50°F) as this causes poor adhesion and extended drying times. Professional miniature painters often use daylight lamps with 95+ CRI ratings to ensure accurate color assessment during the priming process and subsequent painting stages. For detailed priming work on intricate miniatures, consider using adjustable desk lamps with flexible positioning to eliminate shadows and provide consistent illumination across your work surface. Once your miniatures are properly primed, they’ll be ready for terrain coverage calculations and strategic deployment in competitive Warhammer 40K matches.
Spray Consistency Techniques
When zenithal priming goes wrong, spray consistency issues are usually the culprit.
You’ll achieve professional results by maintaining steady spray pressure throughout application. Hold your can or airbrush 6-12 inches from the miniature. Inconsistent distance creates uneven coverage and detail loss.
Nozzle adjustment proves critical for airbrush users. Set air pressure to produce fine mist patterns suited for miniature scale. Test spray patterns on practice surfaces before touching your model. This prevents costly mistakes on expensive figures.
Warm spray cans to room temperature before use. Cold cans produce grainy, uneven textures that ruin smooth gradients. Shake vigorously for the recommended duration to guarantee proper paint mixing.
Clean airbrush nozzles regularly to prevent clogging that disrupts spray uniformity and creates splattering patterns.
On a final note
You’ve mastered zenithal priming‘s essential techniques and applications. Your miniatures now feature realistic light-shadow mapping that’ll guide your painting process. Don’t rush the technique-practice creates consistent results. Your primer layers provide directional lighting reference for color placement and highlight positioning. Remember these fundamentals: maintain proper spray distance, apply thin coats, and work in controlled lighting conditions. You’ll achieve professional-quality results by following these established methods and troubleshooting guidelines consistently.