We are supported by our audience. When you purchase through links on our site, we may earn an affiliate commission, at no extra cost for you. Learn more. Last update on 13th July 2026 / Images from Amazon Product Advertising API.
You’ll cure resin prints by exposing them to 405nm UV light in a dedicated curing chamber after cleaning with isopropyl alcohol for three minutes. Standard resins need 1-2 minutes of UV exposure, while engineering materials require up to 120 minutes depending on size and complexity. Use rotating turntables for uniform 360° coverage and remove supports before curing for easier detachment. Proper curing transforms green prints into durable polymer chains with enhanced strength and dimensional stability, though mastering ideal timing prevents common issues like brittleness or structural weakness.
Notable Insights
- Clean prints thoroughly with isopropyl alcohol for three minutes and remove all support structures before curing.
- Use a dedicated UV curing chamber with 405nm LED lights and rotating turntable for uniform exposure.
- Cure miniatures for 1-2 minutes and larger prints for 5-10 minutes, adjusting based on resin type.
- Test curing times incrementally to avoid over-curing brittleness or under-curing tackiness and weakness.
- Sand progressively from 200-grit to fine grits for smooth surfaces, then prime before painting.
Understanding the Curing Process for Resin Prints
When you complete a resin print, the part isn’t actually finished-it’s in what’s called a “green” state that requires UV curing to achieve its final properties.
The curing chemistry involves a photochemical reaction where UV light exposure transforms liquid resin molecules into solid polymer chains. This process fundamentally changes your print’s mechanical characteristics.
Proper curing greatly improves print durability by increasing strength and dimensional stability. Without adequate UV exposure, your prints remain tacky and mechanically weak. The standard 405nm wavelength initiates this solidification process effectively across all print surfaces.
Curing times vary considerably-from minutes for standard resins to over an hour for engineering materials. Your resin manufacturer’s specifications guide ideal exposure duration. Before beginning the curing process, place prints in a shaded area for 30-60 minutes to ensure they are completely dry.
Many users prefer wash and cure systems like the ANYCUBIC model that provide controlled UV exposure with adjustable timer settings. Place your prints in a sunny location for 2 to 8 hours until surfaces are no longer sticky.
This post-processing step transforms your green part into a fully functional component ready for real-world applications.
Essential Equipment and Tools for UV Curing
Three critical equipment categories determine your UV curing success: dedicated curing chambers, appropriate light sources, and supporting accessories.
Essential equipment includes enclosed curing chambers with reflective interior surfaces like polished stainless steel that guarantee uniform light distribution. These curing setups typically accommodate various print sizes, with chamber volumes around 300x200x300mm for larger models.
Your precision tools should feature:
- LED UV light arrays operating at 405nm wavelength for peak resin photoinitiator activation
- Rotating turntables providing automated 360° exposure to prevent weak spots from uneven curing
- Programmable timing controls allowing 1-120 minute cycles based on resin requirements
Safety measures include UV protective enclosures preventing premature curing and user exposure. Professional curing stations offer built-in filters on viewing panels that automatically block harmful UV radiation during operation.
Advanced stations combine light with heat sources, accelerating polymerization while improving mechanical properties. Water tanks in some models control heat transfer, reducing print shrinkage during curing cycles.
Preparing Your Prints Before Curing
Proper preparation transforms your freshly printed resin models from fragile, uncured objects into durable finished pieces ready for UV exposure.
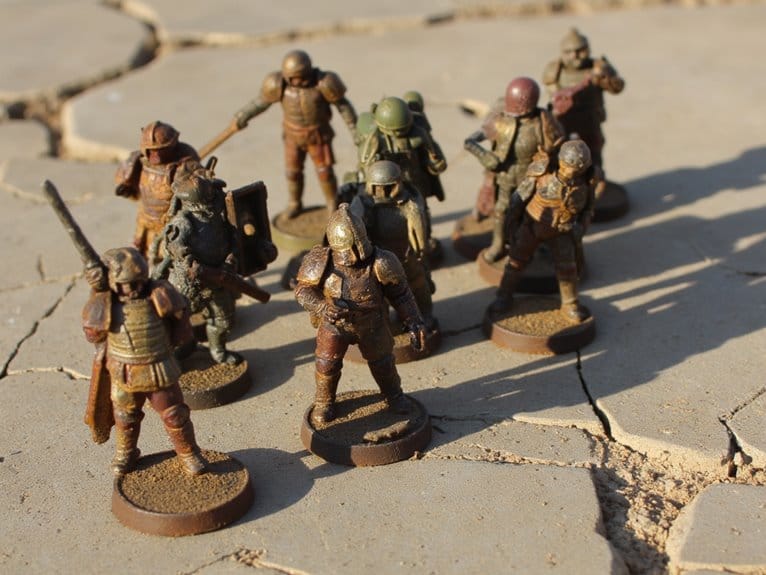
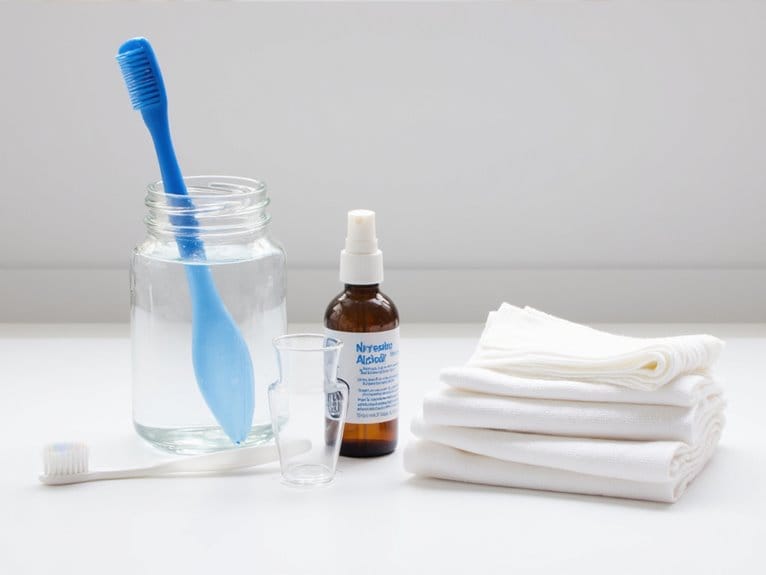
Begin with thorough print inspection, examining all angles for remaining uncured resin or support remnants. Submerge prints in isopropyl alcohol for three minutes, using proper ventilation and nitrile gloves. Remove support structures before curing using flush cutters, as they’re easier to detach when not fully hardened. File down remaining nubs for smooth finishes.
Effective drying methods include towels or hair dryers to eliminate moisture completely. Keep prints away from ambient UV light during preparation to prevent premature curing. Position models efficiently on clean trays, ensuring sufficient space for rotation.
Perform tactile checks for sticky areas indicating incomplete cleaning. Confirm structural integrity before proceeding to UV exposure.
Determining Optimal Curing Times and Methods
Since curing transforms uncured resin into a hardened final product through UV polymerization, understanding the variables that affect this process guarantees you’ll achieve excellent results every time.
Your ideal exposure depends on multiple interconnected factors that directly influence curing duration.
Three critical variables determine your curing parameters:
- Print characteristics – Miniatures need 1-2 minutes while large prints require 5-10 minutes under curing stations.
- Resin specifications – Standard resins cure in one minute; engineering resins demand up to 120 minutes.
- Equipment capabilities – Curing stations provide controlled wavelengths and consistent intensity compared to sunlight.
Environmental conditions also affect results.
Higher temperatures accelerate polymerization, while complex geometries with thin walls need extended exposure for complete light penetration.
Always test incrementally rather than over-curing initially.
Step-by-Step Curing Techniques
Now you’ll execute the actual curing process using the preparation work you’ve completed.
The curing workflow consists of two critical phases: pre-curing preparation steps that guarantee your print is ready for UV exposure, and the controlled UV exposure process that transforms the resin into its final hardened state.
Following these sequential steps in the correct order prevents defects and produces consistently strong, fully-cured prints.
Pre-Curing Preparation Steps
Before you can achieve ideal curing results, your resin prints must undergo thorough preparation to remove contaminants and confirm uniform UV light penetration.
Proper pre-curing preparation guarantees prime polymerization and surface quality. Remove all support structure elements while they’re still soft, using flush cutters to minimize surface damage. File down remaining nubs smoothly. Your resin’s viscosity affects adhesion during printing, but post-processing requires different considerations.
Follow these critical preparation steps:
- Clean thoroughly – Submerge prints in IPA for three minutes, using nitrile gloves in ventilated areas.
- Inspect meticulously – Check for uncured resin residue or missed supports using magnification tools.
- Dry completely – Allow total solvent evaporation to prevent trapped moisture during curing.
Maintain dust-free conditions throughout preparation. Complete drying prevents solvent entrapment that compromises final strength.
UV Exposure Process
Once your print’s completely dry and free of contaminants, you’ll begin the UV exposure process using equipment specifically designed for 405nm wavelength output.
Professional curing machines like the Anycubic Wash & Cure Plus deliver controlled, uniform exposure through rotating platforms. These UV lamp specifications guarantee ideal photopolymerization compared to inconsistent natural sunlight.
Position your print to receive direct light on all surfaces. Rotate manually every few minutes if you lack automated turntables.
Standard curing duration ranges from 15-30 minutes depending on model size and resin type. UV exposure techniques require avoiding shadows that create weak spots.
Monitor progress by checking for tackiness. Extend exposure incrementally if surfaces remain soft.
Over-curing causes brittleness, while under-curing leaves prints structurally compromised.
Common Curing Problems and How to Avoid Them
Three primary categories of curing problems plague resin printing: exposure-related defects, environmental interference, and material compatibility issues. Understanding these problems prevents costly reprints and material waste.
Underexposure troubleshooting starts with identifying weak, rubbery surfaces and deformed shapes. You’ll notice tacky surfaces that attract dirt and partially cured resin that cracks easily.
Increase UV exposure times gradually in 5-10 second increments until surfaces cure completely.
Overexposure effects include excessive brittleness and lost fine details. Holes fill in, features blur, and bases enlarge beyond specifications.
Calibrate exposure times precisely to prevent raft-only prints.
Three critical prevention strategies:
- Monitor environmental conditions – Replace expired resin and maintain 68-75°F ambient temperature.
- Clean optical components – Remove resin residue blocking UV penetration.
- Optimize support structures – Increase contact area for complex geometries.
Modern high-performance resins featuring low shrinkage rates significantly reduce warping and dimensional inaccuracies during the curing process.
Post-Curing Finishing and Support Removal
Once your resin print completes the post-curing process, you’ll need to carefully remove supports and refine the surface to achieve professional-quality results.
The timing of support removal-whether before partial curing or after full curing-directly affects how cleanly they separate and whether delicate features survive the process intact.
Proper sanding techniques and final finishing steps transform your cured print from a rough prototype into a smooth, ready-to-use part with minimal visible artifacts from the printing process.
Support Removal Timing
The timing of support removal greatly impacts both the quality of your finished print and the difficulty of the removal process itself.
Different resin types require specific support removal techniques to prevent damage and guarantee ideal results.
Support Removal Timing Strategies:
- Remove immediately after printing – Best for most standard resins to minimize surface damage like divots or warping before post-washing begins.
- Remove after IPA cleaning – IPA swells resin contact points, making support detachment easier while reducing contamination spread.
- Remove after post-curing – Required for elastic and flexible resins to maintain part integrity, though this increases bond strength for rigid materials.
Your resin manufacturer’s guidelines should dictate timing, as cured supports become considerably harder to remove without part damage.
Surface Sanding Techniques
Surface imperfections on resin prints require systematic sanding to achieve professional-quality results.
Your sanding techniques should begin with 200-grit sandpaper to eliminate layer lines and rough surfaces. Progress through increasingly finer grits up to 3000 for smooth finishes, or 12,000 for reflective surfaces on detailed prints.
Wet sanding delivers superior results by reducing dust and preventing heat buildup. Dip your sandpaper in water throughout the process.
Use sanding sponges on curved surfaces for better control and conformity to complex geometries.
Maintain consistent pressure to avoid creating uneven spots. Start with coarse grit for visible imperfections, then shift to gentle polishing phases.
This grit progression systematically removes scratches from previous sanding stages, ensuring a glass-smooth final surface ready for painting or display.
Final Finishing Steps
After achieving smooth surfaces through progressive sanding, you’ll need to complete two critical procedures that determine your print’s final quality: proper support removal and thorough post-curing.
Remove supports using flush cutters at the smallest contact points while the print remains slightly flexible. Cut close to the model surface to preserve fine details. Inspect attachment sites and sand lightly if needed for smooth shifts.
Execute post-curing in controlled UV chambers with even light distribution. Follow manufacturer specifications for timing-typically 5-15 minutes depending on resin type. Clean prints thoroughly with IPA before curing to prevent contamination.
Apply these finishing techniques for professional results:
- Prime surfaces before painting to guarantee proper adhesion
- Apply protective surface coatings for enhanced durability and UV resistance
- Store cured parts away from excessive heat and direct sunlight
Different resin formulations require varying post-curing times, with some ABS-like resins needing extended exposure for optimal heat resistance up to 55°C.
Achieving Professional Results Through Proper Technique
When you’re aiming for professional-grade resin prints, mastering the fundamentals makes the difference between mediocre results and exceptional output.
Resin consistency starts with proper temperature control at 20°C and vigorous 2-minute mixing before each pour. This guarantees uniform pigment distribution and ideal viscosity for print accuracy.
Temperature-controlled resin at 20°C with thorough 2-minute mixing ensures optimal pigment distribution and printing viscosity for professional results.
Your UV exposure settings require calibration for each resin type. Don’t default to 80-100% power-adjust based on manufacturer specifications.
Post-curing demands active cleaning with isopropyl alcohol and agitation, not passive soaking. Use dedicated UV stations for complete polymerization.
Model orientation minimizes overhangs while maximizing bed adhesion. Generate supports strategically to balance removal ease with structural integrity.
Regular Z-axis calibration and FEP film maintenance prevent mechanical inconsistencies that compromise surface finish and dimensional accuracy.
After curing, apply a high-quality acrylic surface primer designed for photopolymer surfaces to ensure exceptional adhesion and detail preservation for subsequent paint applications.
On a final note
You’ve now mastered the complete resin curing process. Your prints will achieve maximum strength and durability when you follow proper UV exposure times, maintain consistent temperatures, and use appropriate safety equipment. Remember to clean thoroughly before curing and inspect for any defects afterward. With these techniques, you’ll consistently produce professional-quality results. Don’t rush the process-proper curing takes time but guarantees your prints reach their full mechanical properties and surface finish potential.