We are supported by our audience. When you purchase through links on our site, we may earn an affiliate commission, at no extra cost for you. Learn more. Last update on 23rd July 2026 / Images from Amazon Product Advertising API.
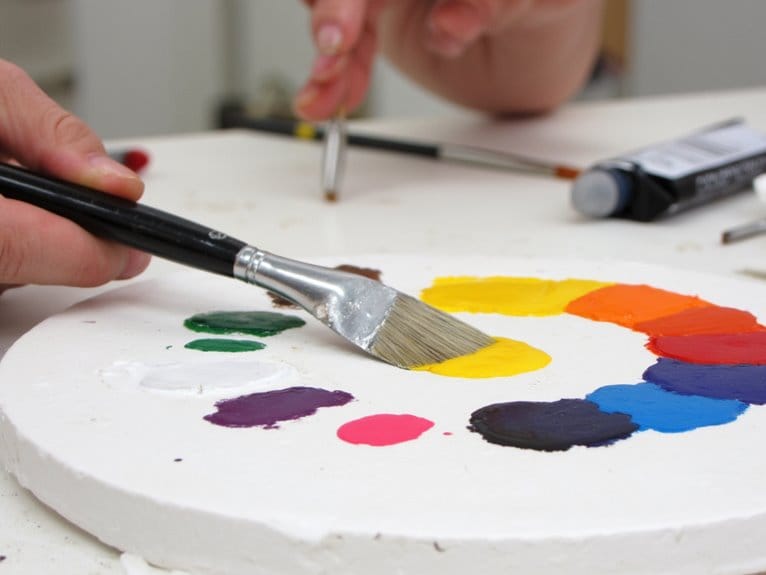
You’ll need an airtight container, foam pad, and semi-permeable palette paper to create your wet palette. Saturate the foam completely, then place the palette paper flat against it without wrinkles. Add water using a pipette-7cl for painter size, 15cl for studio size containers. Load your brush directly from the moistened paint, removing excess water to prevent dilution. This setup keeps acrylics workable for days while enabling smooth blending and consistent viscosity control for detailed miniature work.
Notable Insights
- Assemble your wet palette with an airtight container, saturated foam pad, and semi-permeable paper for moisture control.
- Add appropriate water amounts (7cl for small, 15cl for large) and ensure foam is damp without dripping.
- Load brushes from wet palette paint while removing excess water to prevent unwanted dilution during application.
- Maintain consistent moisture by checking saturation regularly and adjusting water levels with pipettes as needed.
- Clean palette pads with warm soapy water after sessions and store components separately for longevity.
Why Every Miniature Painter Needs a Wet Palette
While traditional palettes force you to race against rapidly drying paint, wet palettes fundamentally change how you approach miniature painting by maintaining paint workability for extended periods.
Paint longevity extends from hours to weeks through controlled moisture retention. This dramatically improves waste reduction by preventing dried paint disposal.
Controlled moisture retention transforms paint longevity from mere hours to weeks, dramatically reducing waste from dried paint disposal.
Advanced blending techniques become accessible as extended working time supports smooth color changes and glazing effects.
Workflow improvement occurs through reduced mixing frequency and consistent paint viscosity control. Your painter convenience increases with seamless session resumption and minimal cleanup requirements.
Cost efficiency emerges from reduced paint purchases and preserved custom color mixtures.
Effective resource management minimizes material consumption while supporting larger volume purchases. Wet palettes are particularly beneficial for new painters who need more time to develop their techniques and complete projects at a slower pace.
The environmental impact decreases through reduced waste generation, making wet palettes essential tools for sustainable miniature painting practices. Professional-grade moisture retention systems can reduce paint waste by 60-80% compared to traditional dry palettes. The Everlasting Wet Palette v2 gained recognition as the most successful Kickstarter campaign in the miniature painting community with nearly 14,000 backers.
Essential Components of a Wet Palette Setup
A successful wet palette functions like a controlled humidity chamber, requiring four essential components that work together to maintain paint workability.
The air-tight container forms your foundation-plastic construction with tight-fitting lids prevents moisture escape. Choose “Painter size” for portability or “Studio size” for extended sessions.
The moisture retention layer consists of foam or sponge soaked with precise water volumes: 7 cl for small palettes, 15 cl for larger ones. This component expands when saturated, creating continuous humidity without waterlogging your paints.
Semi-permeable palette paper sits atop the foam, allowing controlled moisture transfer while providing your mixing surface. Lay it flat to prevent creases that interfere with paint application.
Water management tools like pipettes enable precise top-ups during painting sessions, maintaining ideal hydration levels for extended paint workability. Avoid using boiling water when cleaning your palette components, as extreme temperatures can damage the materials.
Step-by-Step Guide to Preparing Your Wet Palette
Now you’ll prepare your wet palette by following three critical steps that determine paint performance and working time.
Start by fully saturating your foam pad in water for several minutes, then squeeze out excess moisture until it’s damp but not dripping-this prevents paint dilution while maintaining ideal hydration.
Next, position your palette paper flat against the foam surface without wrinkles or air bubbles, then adjust the moisture balance by adding small amounts of water to the reservoir as needed during your painting session.
Saturate Foam Pad Properly
Proper foam pad saturation forms the foundation of an effective wet palette system for miniature painting. Your hydration foam requires complete water absorption without excess pooling. Submerge the dry pad fully in water for several minutes, allowing total saturation. Remove and squeeze firmly until evenly damp but not dripping. This process preserves foam pad durability by avoiding harsh chemicals or boiling water.
Place the saturated foam flat inside your palette container. Add precise water amounts: 7cl for Painter size, 15cl for Studio size. Water shouldn’t flood above the foam’s surface or create standing pools that’ll dilute your paints.
Monitor saturation throughout painting sessions, adding small quantities every two hours using pipettes for control. Properly saturated foam maintains consistent moisture transfer to your hydration membrane above. The foam’s moisture transfer capability works in conjunction with high-permeability papers to prevent acrylic paints from drying for 8+ hours during extended painting sessions.
Position Palette Paper Correctly
Your palette paper’s placement determines whether your paints stay workable for hours or dry out within minutes. Position the paper centered and flat against your moistened sponge to guarantee uniform moisture transfer. Different paper types require specific positioning techniques – specialized parchment membranes need complete contact, while standard wet palette papers work best with slight margins around edges.
Cut paper to fit snugly in your tray, preventing curls and bubbles that disrupt moisture control. Smooth from one edge to another, expelling trapped air without excessive pressure.
| Issue | Solution |
|---|---|
| Air bubbles forming | Press with flat ruler edge |
| Paper curling upward | Increase sponge moisture slightly |
| Uneven paint consistency | Reposition paper for full contact |
Always verify complete sponge coverage before applying paints.
Adjust Moisture Balance
Three critical factors determine ideal moisture balance: sponge saturation level, paper dampness, and container humidity.
Begin moisture assessment by checking your sponge’s water content. You’ll want moderate saturation-enough to maintain paper dampness without creating surface puddles. Overly wet conditions cause paints to thin excessively, reducing opacity and control.
Monitor paint viscosity regularly during sessions. Properly balanced moisture allows paint to retain working consistency for extended periods while remaining blendable on the palette surface.
If paints become too watery, leave your container lid slightly ajar for controlled evaporation. Conversely, if paint thickens rapidly, increase sponge moisture before your next session.
Adjust water levels incrementally rather than making dramatic changes. This prevents overcorrection that disrupts your painting workflow.
When moisture balance is properly maintained, miniature painters can achieve the same thin layers technique used in professional airbrush applications for optimal coverage and detail work.
Proper Paint Application Techniques on Wet Palettes
Mastery of paint application on wet palettes requires precise control over consistency, moisture levels, and brush technique to achieve professional results on miniatures.
Load your brush by dipping into paint on the wet palette, guaranteeing you’ve adjusted moisture beforehand for desired opacity and paint flow. Remove excess water from your brush using a paper towel after rinsing to prevent undesirable paint dilution.
Proper brush loading from wet palettes demands pre-adjusted paint moisture and excess water removal to prevent unwanted dilution.
Apply paint using controlled brush strokes that maximize thin layers. This approach builds color depth without obscuring miniature details. Clean your brush between colors to maintain color clarity.
Use the palette for quick consistency adjustments during painting sessions. Adjust paint dilution dynamically by dipping into water or loading paint directly from the palette.
Effective brush control guarantees even coverage while the wet palette maintains peak paint flow throughout your painting session. Quality stay wet palettes with proper moisture retention can keep paints workable for up to a week, allowing for extended painting sessions without paint waste.
Color Mixing and Blending Strategies
While proper paint application forms the foundation of miniature painting, effective color mixing and blending on wet palettes elevates your work from basic coverage to professional-quality results.
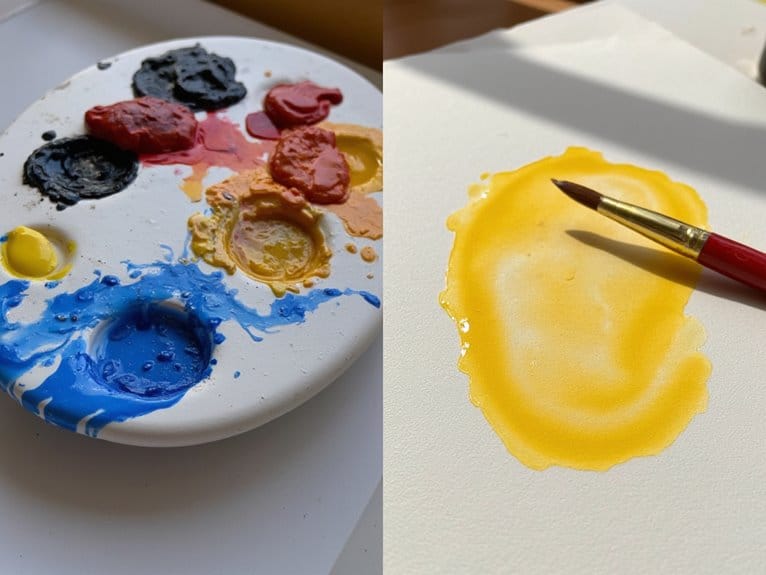
Color theory principles guide successful mixing. Use similar hue families-teals with blues-for natural blends. Hold mixed colors adjacent on your palette to verify tonal harmony before application. Organize base colors in shadow-midtone-highlight rows for systematic layering.
Control mixing ratios precisely. Use 3:1 shadow-to-midtone or 1:2 midtone-to-highlight ratios for consistent gradations. Work from secondary mixed pools while keeping original drops clean. Test intermediate blends on the palette before applying to prevent abrupt tonal shifts. High-concentration pigments in quality acrylic paints yield rich, intense colors that enhance surface details and reduce the number of coats needed for full coverage.
| Mixing Ratio | Purpose | Application Method |
|---|---|---|
| 3:1 | Deep shadows | Multiple thin layers |
| 1:1 | Smooth shifts | Gradual blending |
| 1:2 | Subtle highlights | Progressive lightening |
Professional miniature painters often employ layering techniques alongside wet blending and dry brushing to achieve maximum control over detailed work and enhance overall paint quality. The wet palette’s moisture extends working time, enabling extended blending sessions and professional-quality smooth shifts. Quality paints with superior opacity ensure consistent color density across your miniature’s surface, making color mixing more predictable and reliable. Begin with non-toxic formulations that meet safety standards and provide excellent blending capabilities for creating custom shades and complex color transitions.
Cleaning and Maintenance Best Practices
Although wet palettes require consistent care to function at their best, establishing proper cleaning techniques and maintenance routines prevents contamination and extends equipment lifespan considerably.
Clean foam pads and palette cases with warm, soapy water after each session. Avoid boiling water, dishwashers, or harsh chemicals that damage foam and plastic components. Rinse thoroughly to eliminate soap residue affecting paint consistency. For dried paint buildup, soak foam briefly before gentle scrubbing.
Replace membranes regularly to maintain smooth mixing surfaces. Keep lids slightly ajar during breaks for air circulation, preventing mold formation.
Store components separately when unused for extended periods, ensuring complete drying. Maintain water levels just at foam top-saturated but not flooding paint surfaces.
Inspect regularly for mold signs and discard contaminated materials immediately.
Consider using specialized brushes like brass, nylon, or stainless steel variants for thorough cleaning of stubborn paint residue from palette components.
Storage Tips for Maximum Paint Longevity
Your wet palette’s storage method directly determines how long your paints remain workable between painting sessions.
Proper sealing techniques prevent air exposure that causes premature drying, while controlled environmental conditions maintain the delicate moisture balance your paints need.
These two factors work together to extend paint life from hours to several days when implemented correctly.
For paints that have begun to thicken during storage, adding flow improvers can restore optimal consistency and extend their usable life on the palette.
Proper Sealing Techniques
Three critical factors determine how long your paint mixes remain workable on a wet palette: lid position, moisture balance, and environmental conditions.
Fully sealing creates a humid sealed environment that prevents evaporation but can over-hydrate paint. A slightly cracked lid prevents condensation buildup while maintaining adequate humidity.
Test different lid positions based on your local humidity and paint type. Monitor the paper’s moisture level after each session to find the ideal balance. Too much airflow dries paint quickly; insufficient ventilation causes liquefaction.
Effective moisture management requires dampened but not oversaturated sponges. Smooth palette paper ensures even hydration distribution.
Seal immediately after painting sessions to preserve color consistency. Most paint mixes remain workable for 1-2 days with proper sealing techniques.
Maintaining your wet palette properly extends brush life since precision brushes last longer when used with consistently hydrated paints rather than dried-out mixtures.
Environmental Storage Conditions
Beyond achieving proper lid positioning and moisture balance, the storage environment itself plays a determining role in paint longevity. Temperature control requires maintaining stable, cool conditions while avoiding dramatic fluctuations that create excess condensation. Room temperature storage provides ideal balance between drying prevention and moisture regulation. Humidity management involves storing palettes in low to moderate humidity environments to minimize condensation buildup.
| Environmental Factor | Ideal Condition | Avoid |
|---|---|---|
| Temperature | Room temperature, stable | Direct sunlight, heat sources |
| Humidity | Low to moderate levels | High humidity areas |
| Light Exposure | Minimal UV exposure | Strong artificial/natural light |
Store palettes in dry, ventilated locations away from light sources. Use opaque containers for long-term storage and maintain proper airflow without leaving lids open continuously.
Commercial Vs DIY Wet Palette Options
When choosing between commercial and DIY wet palette systems, you’ll encounter distinct trade-offs in cost, convenience, and performance that directly impact your painting workflow.
Commercial palettes like the Redgrass Games V2 offer superior sealing mechanisms and pre-cut components designed specifically for miniature painting. They maintain paint hydration for days or weeks through engineered moisture distribution systems. However, they require higher upfront investment ranging from moderate to premium pricing.
DIY alternatives constructed from household containers, sponges, and parchment paper provide excellent cost efficiency for budget-conscious painters. You’ll sacrifice some moisture control consistency and durability but gain complete customization over size and materials.
Your user preferences should guide this decision: frequent painters benefit from commercial reliability, while beginners can learn wet palette techniques through accessible DIY methods before committing to specialized equipment.
On a final note
You’ve mastered the fundamentals of wet palette operation. Your paints will maintain workability for days when you follow proper hydration protocols. Store your palette in an airtight container between sessions. Replace parchment paper every 3-5 days to prevent bacterial growth. Clean your sponge weekly with distilled water. Whether you choose commercial or DIY setups, consistent maintenance guarantees peak paint consistency and extended working times for superior miniature finishes.