We are supported by our audience. When you purchase through links on our site, we may earn an affiliate commission, at no extra cost for you. Learn more. Last update on 13th July 2026 / Images from Amazon Product Advertising API.
You’ll achieve professional miniature painting results by selecting a dual-action airbrush with a 0.3mm nozzle for versatile coverage. Thin your acrylics to a 50:50 paint-to-medium ratio for ideal flow, then maintain 15-30 PSI air pressure depending on your nozzle size. Master trigger control by establishing airflow before releasing paint, making smooth horizontal passes while keeping consistent distance from your miniature. Practice on terrain pieces first to develop steady movements and pressure control before advancing to detailed work.
Notable Insights
- Choose a 0.3mm nozzle airbrush for all-purpose miniature work, with gravity-feed systems offering the best precision control.
- Thin acrylic paints to a 50:50 ratio with dedicated airbrush medium for optimal flow and adhesion.
- Master dual-action trigger control by pressing for air first, then pulling gradually for smooth paint release.
- Apply multiple thin, transparent layers rather than single thick coats to achieve superior color depth and detail.
- Use masking tape and stencils to protect detailed areas while maintaining 15-20 PSI pressure for clean edges.
Selecting the Right Airbrush Equipment for Miniatures
Choosing the right airbrush equipment can make or break your miniature painting experience.
You’ll need to understand airbrush types and feed systems first. Gravity-feed airbrushes work best for miniatures because they position paint cups on top, reducing waste and improving precision. Side-feed and siphon-feed models are bulkier and less accurate for detailed work.
Budget considerations matter greatly. Entry-level options under $100 suit beginners, while mid-range models ($100-$200) balance quality and performance. Premium airbrushes above $200 deliver professional-grade results.
Your airbrush budget determines your painting success-invest wisely based on your skill level and long-term goals.
The Badger Patriot 105 offers beginner-friendly versatility, while the Sotar 20/20 provides advanced precision. For most miniature projects, a 0.3mm nozzle delivers optimal all-purpose performance across different painting requirements.
Essential accessories include an air compressor, compatible hoses, cleaning supplies, and paint thinners. Look for compressors with adjustable PSI settings ranging from 2-55 PSI to achieve precise control over your airbrushing applications. Proper maintenance is crucial for optimal performance and preventing costly repairs.
These components add to your total investment beyond the airbrush unit itself.
Understanding Nozzle Sizes and Air Pressure Settings
Understanding nozzle sizes and air pressure settings forms the technical foundation of successful miniature airbrushing. Nozzle types range from 0.15mm for precise detail work to 0.5mm for base coating. You’ll achieve ideal results by matching nozzle diameter to your specific task.
Fine detailing on 1/144 scale models requires 0.15-0.2mm nozzles, while 1/35 scale tanks work best with 0.3-0.4mm options.
Air pressure directly correlates with nozzle size selection. Smaller nozzles demand lower pressure settings around 15 PSI to prevent overspray. Larger nozzles tolerate higher pressures up to 30 PSI without clogging. Medium nozzles provide excellent blending capabilities for gradients across larger surface areas.
Mismatched combinations cause spitting, uneven atomization, or paint buildup. Always test pressure and nozzle combinations on practice surfaces before painting your miniatures. For beginners, mid-tier airbrushes offer the optimal balance between control precision and ease of management.
Preparing Acrylic Paints for Optimal Flow and Atomization
Three critical factors determine whether your acrylic paint will flow smoothly through an airbrush: proper thinning ratios, medium selection, and consistency testing.
Start with a 50:50 paint-to-thinner ratio, adjusting based on your specific paint brand and pigment density. Target a consistency similar to light cream or milk for ideal atomization without spattering.
Essential preparation steps include:
- Use dedicated airbrush paint mediums like Liquitex Airbrush Medium instead of water for better adhesion.
- Add thinner to your mixing container before paint to prevent lumps.
- Filter thinned paint through fine mesh to remove debris that clogs nozzles.
- Test spray patterns on similar surfaces before applying to miniatures.
- Prepare small batches to prevent drying and settling during use.
Paint additives such as flow improvers reduce clogging when diluted up to 80% with paint, though excessive dilution weakens pigment strength. Professional acrylic inks require no thinning and provide excellent results straight from the bottle for miniature applications. For optimal performance, choose paints with particle sizes under 35 micrometers to minimize clogging and ensure consistent flow through your airbrush system. For beginners working with Citadel or Vallejo paints, a 1.5 to 1 ratio of water to paint offers an effective starting point that can be adjusted based on paint thickness and desired coverage.
Testing Paint Consistency and Spray Patterns
Once you’ve achieved the proper paint consistency, you must verify it performs correctly through systematic testing before applying it to your miniatures. Start by conducting drop tests on disposable paper or plastic cards.
Apply three drops of paint and observe flow behavior to assess paint viscosity. Properly thinned paint flows smoothly without splattering into “spider” or “millipede” patterns.
Test spray patterns using dual-action trigger control. Push down for air, then gradually pull back to introduce paint flow. Proper spray accuracy produces fine mist atomization rather than droplets or grainy patches.
Watch for consistent coverage without pooling or overspray. Block the nozzle and pull the trigger to create backflow for mixing verification.
Adjust compressor pressure based on test results to eliminate clogging or poor atomization. Most airbrushes operate within a pressure range of 20 to 55 PSI, so experiment within these parameters to find your optimal setting. This precise control over paint application allows you to achieve professional-quality results on your miniatures.
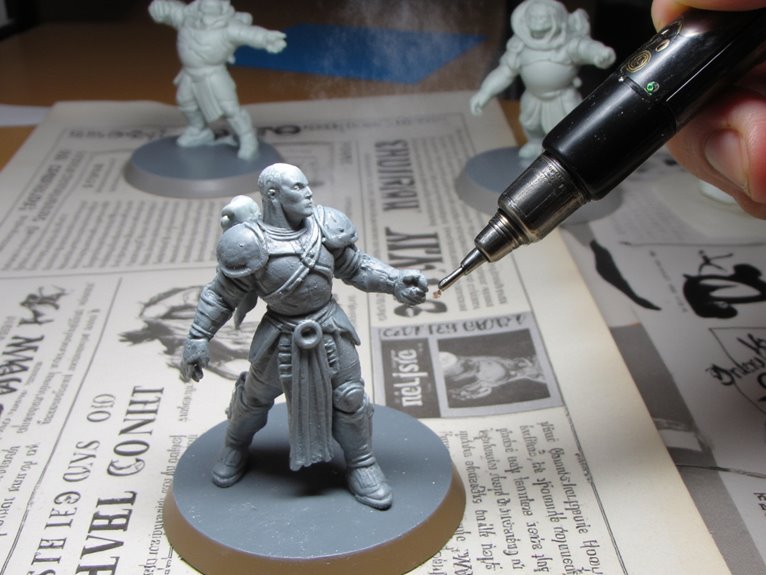
Mastering Basic Trigger Control and Movement Techniques
Understanding dual-action trigger mechanics forms the foundation of effective airbrush control for miniature painting.
You’ll need to coordinate two distinct movements: pressing down for airflow and pulling back for paint release, with each action requiring precise timing and pressure control.
Mastering smooth horizontal passes combines this trigger control with steady hand movement, allowing you to apply even paint layers across your miniature’s surface without creating streaks or overspray patterns.
For optimal results, maintain consistent pressure settings between 15-50 PSI depending on your paint thickness and desired coverage area.
Dual-Action Trigger Mechanics
While single-action airbrushes offer simplicity, dual-action triggers provide the precision control that separates amateur work from professional miniature painting results.
The dual-action mechanism operates on two distinct axes: downward pressure releases airflow, while backward pull controls paint volume. You must establish airflow before introducing paint to prevent splatter and guarantee proper atomization. This sequence-air first, paint second-forms the foundation of professional technique.
Master these essential dual-action principles:
- Press down for air, pull back for paint in smooth, coordinated movements
- Maintain consistent trigger pressure adjustment throughout each stroke
- Start and finish every spray with air-only flow
- Practice gradual trigger modulation to control paint thickness instantly
- Coordinate trigger manipulation with distance and angle adjustments
Proper dual-action control reduces paint waste while enabling seamless shifts between fine detail work and broad coverage.
Regular airbrush maintenance keeps trigger response precise and predictable.
Smooth Horizontal Pass Technique
Mastering dual-action trigger control means nothing without proper horizontal movement technique to deliver that precision onto your miniatures.
Your spray control depends on maintaining steady, uninterrupted passes across the surface while keeping consistent distance from the nozzle to miniature.
Start each pass off the miniature surface. Press the trigger down for air first, then pull back gradually for paint release during your horizontal sweep. End by pushing the trigger forward to cut paint flow while maintaining slight air pressure before full release.
Move deliberately across your miniature without stopping mid-pass. Overlap passes slightly to build even coverage. Your trigger modulation should vary paint flow smoothly throughout each stroke, creating gradients and soft shifts.
Practice this air-only start and stop sequence until it becomes instinctive for professional results.
Building Color With Multiple Thin Coats
You’ll achieve superior color depth and maintain crisp detail by applying multiple thin coats rather than attempting full coverage in one pass.
This layering technique requires proper paint thinning to milk-like consistency and controlled spray patterns at 15-20 PSI air pressure.
Each transparent layer must dry completely before the next application, allowing you to build smooth gradients while preserving the miniature’s fine surface details.
Professional miniature painters often prefer gravity-feed systems for this precise layering work since they provide superior paint control for fine detail applications.
Thin Coat Application Technique
Building up color through multiple thin coats sets the foundation for professional-quality miniature painting results. Achieving proper paint consistency requires thinning ratios between 1:1 and 1:4, depending on your paint brand and airbrush nozzle size.
Layer transparency becomes controllable when you maintain consistent distance and trigger control throughout each pass.
Master these essential thin coat techniques:
- Start and end each spray with air-only to prevent paint splattering
- Use short bursts instead of saturating single areas at once
- Allow complete drying between layers to avoid muddy color mixing
- Maintain steady distance and speed for even coverage
- Control dual-action trigger smoothly for consistent paint flow
This methodical approach preserves miniature details while building rich color depth. Each transparent layer adds intensity without obscuring sculpted features.
Layering for Even Coverage
When you apply multiple thin coats through strategic layering, each transparent layer builds upon the previous one to create smooth, even coverage that preserves every detail of your miniature. Your airbrush excels at this technique because it delivers consistent paint distribution across complex surfaces.
Start with medium-diluted paint-thinner than brush consistency but thicker than wash. This viscosity guarantees proper opacity buildup without detail obscuration. Apply each layer using lateral spray motions at 6-8 inch distances. Allow complete drying between coats to prevent paint lifting.
Effective layering techniques require progressive color adjustments. Begin with your base shade, then incrementally lighten or darken subsequent layers.
These color shifts create dimensional depth while maintaining underlying layer visibility. Plan your sequence carefully-darker bases mute upper tones, while lighter foundations brighten overlaying colors.
Avoiding Detail Loss
Every successful miniature paint job depends on preserving the sculptor’s intricate work while achieving rich, vibrant colors.
Paint layering through multiple thin coats prevents detail loss while building color intensity gradually. Thin your acrylics to milk-like consistency using water or airbrush thinner.
Essential techniques for detail preservation:
- Maintain 15-20 PSI air pressure with consistent spray distance
- Apply quick, sweeping passes rather than holding position
- Allow each coat to dry completely before applying the next
- Test spray patterns to avoid over-thinning that reduces opacity
- Keep paint flowing steadily to prevent pooling on miniature surfaces
Proper airbrush maintenance guarantees consistent thin coat application. Clean your airbrush between colors to prevent contamination.
Multiple translucent layers create richer tonality than single thick applications while maintaining crisp sculptural features.
Using Masking Techniques to Protect Detailed Areas
Since airbrush overspray can easily ruin hours of careful detail work on miniatures, masking techniques become essential for protecting specific areas during painting. Quality masking tape designed for model painting provides the most reliable foundation for effective coverage. Apply tape along edges with full adhesion to prevent paint bleed-through.
| Material | Application | Removal Timing |
|---|---|---|
| Masking Tape | Press firmly along edges | When paint is semi-dry |
| Liquid Mask | Brush on fine details | After complete drying |
| Blu Tack | Mold around raised areas | Immediately after spraying |
| Pre-cut Stencils | Align over complex shapes | Remove slowly to avoid peeling |
Liquid masking fluids excel at protecting intricate features like weapon details or facial features. Let these fluids dry completely before airbrushing to prevent lifting during application.
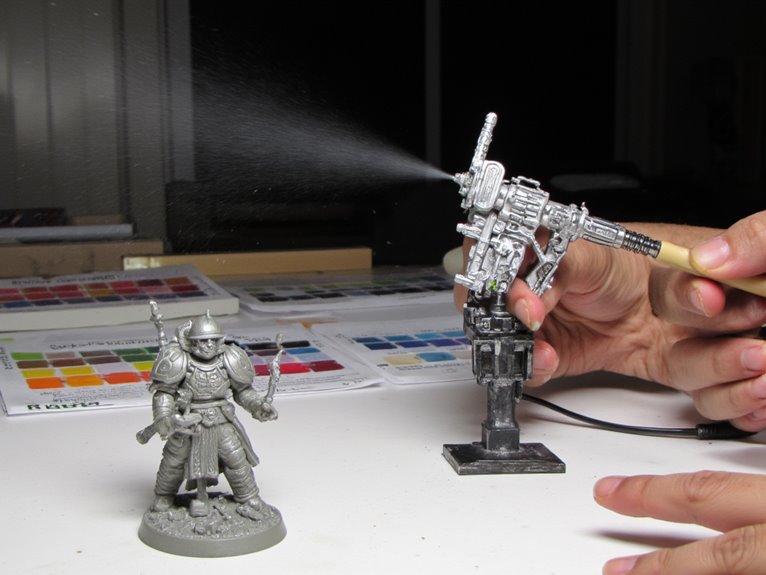
Creating Zenithal Highlighting for Natural Light Effects
Once you’ve protected your detailed areas through proper masking, you can begin implementing zenithal highlighting to establish natural lighting effects across your miniature. This technique simulates overhead light sources by applying progressively lighter tones from a 30° to 45° angle above your model.
Start with dark primer coverage, then spray zenithal colors like gray or desaturated base tones from above. This creates natural shadows in recesses while illuminating raised surfaces. Use a 0.3mm or larger nozzle for best control.
Dark primer foundation paired with overhead gray spraying creates dramatic shadow-to-highlight contrast while larger nozzles ensure optimal control.
Key zenithal highlighting steps:
- Apply dark primer for shadow foundation
- Spray lighter tones from overhead angles
- Maintain consistent air pressure and distance
- Keep spray patterns soft for gradual shifts
- Allow full drying between layers
This foundation accelerates your painting process while establishing realistic three-dimensional contrast.
Applying Glazing and Tonal Gradients for Depth
Glazing transforms your miniature painting by building smooth color shifts through multiple transparent layers that preserve underlying detail.
You’ll apply highly diluted paint in thin, even coats that act as color filters rather than opaque coverage.
This technique requires precise airbrush control at low pressure settings to achieve seamless tonal gradients that add realistic depth to your models.
Glazing Technique Fundamentals
Mastering airbrushed glazes transforms your miniatures from flat, single-toned surfaces into dynamic models with convincing depth and visual interest.
Glazing application requires paint thinned to translucent consistency using acrylic medium or water. This technique acts as a color filter, building gradual tonal shifts without obscuring underlying detail.
Essential glazing fundamentals include:
- Thin consistency – Dilute paint considerably beyond normal spray ratios
- Multiple layers – Apply several translucent coats rather than single heavy applications
- Controlled pressure – Use short bursts at low PSI to prevent flooding
- Strategic drying – Allow each layer to cure before applying the next
- Color harmonization – Layer complementary tones to unify diverse base colors
Your airbrush enables ultra-smooth coverage impossible with traditional brushes.
Practice pressure modulation and paint viscosity adjustments to achieve professional-quality tonal gradients and realistic depth perception.
Creating Smooth Gradients
The secret to professional-quality miniature painting lies in your ability to control paint deposition through precise trigger manipulation and distance variations. Maintain 15-20 psi air pressure for ideal control over spray width and paint flow.
Build transparent layers gradually through multiple light passes rather than heavy single coats. This prevents pooling and maintains detail definition.
Start with your dominant base color, then introduce darker or lighter shades systematically. Use complementary colors for shadows-violet shadows on red surfaces create visual interest.
Adjust movement speed and trigger pressure to achieve soft tonal gradients or sharper edge fades. Overlaying transparent glazes harmonizes tones while adding depth.
Allow proper paint drying time between layers to prevent glossy finishes from becoming muddy or uneven.
Achieving Non-Metallic Metal Effects With Smooth Gradients
Non-metallic metal techniques transform ordinary paints into convincing metallic surfaces through careful manipulation of light, shadow, and gradient effects. Your airbrush becomes essential for creating the smooth passages that make NMM techniques believable.
Master the art of non-metallic metal painting by using airbrush techniques to create seamless gradients and realistic metallic illusions.
Start with a black primer base to establish maximum contrast. Apply your base tone using 50% paint diluted with water for opacity control. Build gradients progressively by adding lighter colors in thin layers, focusing on primary light areas first.
- Use blues mixed with silvers for cool metallic tones, reds with golds for warm effects
- Apply glazes at 4:1 water-to-paint ratio to soften harsh passages
- Position highlights strategically near edges and shine zones for realistic reflections
- Add secondary light sources opposite primary lighting for enhanced depth
- Reserve brush work for final sharp edge highlights where airbrush limitations appear
Implementing Stenciling for Precise Patterns and Designs
Your stencil material choice directly impacts pattern quality and durability throughout multiple painting sessions.
Plastic, mylar, and vinyl sheets offer superior paint resistance compared to cardstock, with mylar providing the best edge definition for crisp 1-2mm detail work on 28mm miniatures.
Masking tape serves dual purposes as both a stencil creation tool and edge-sealing method, preventing paint bleed when properly burnished against curved miniature surfaces.
Stencil Material Selection
Consider these key factors when selecting materials:
- Water resistance for compatibility with acrylic paints
- Flexibility to conform to miniature surfaces
- Adhesion properties for precise positioning
- Reusability for repeated pattern applications
- Thickness enhancement based on detail requirements
Match material properties to your specific painting objectives for superior results.
Masking Tape Techniques
While airbrush stenciling creates stunning patterns on miniatures, masking tape serves as your primary tool for achieving razor-sharp edges and protecting previously painted areas during complex design work. Proper masking tape application begins with reducing adhesiveness by temporarily sticking tape onto clean fabric before placement. This prevents paint damage during removal.
Different masking tape types serve specific purposes. Fine tapes work for intricate details, while wider varieties cover large surfaces effectively. Use tweezers for precise positioning on small components.
Airbrush at 15 psi perpendicular to surfaces, building thin layers gradually to seal tape edges and prevent bleed-under. Remove tape slowly while paint remains slightly wet to maintain crisp lines.
Plan multi-layer sequences carefully, applying fresh masks aligned with existing edges for sharp color shifts.
Protecting Finished Work With Airbrush Varnishing
After investing countless hours perfecting your miniature’s paint job, varnishing becomes the critical final step that determines whether your work survives handling and time.
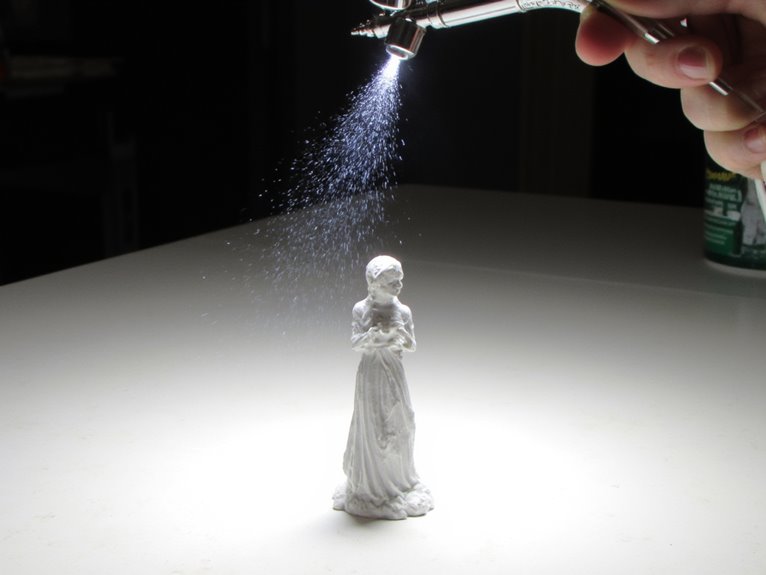
Airbrush varnish application techniques provide superior protection while preserving detail visibility. Dilute acrylic varnish to milky consistency and maintain 20-30 PSI air pressure.
Hold your airbrush 10-20 cm from the miniature for best spray density. Multiple thin coats prevent detail obscuration better than single thick applications.
Essential airbrush safety precautions include:
- Work in well-ventilated spaces to avoid inhaling particles
- Wear protective masks and gloves during application
- Test spray pressure on practice pieces first
- Allow complete curing between coats
- Clean airbrush immediately after use
Choose matt, satin, or gloss finishes based on your desired aesthetic outcome.
Preventing and Solving Common Clogging Issues
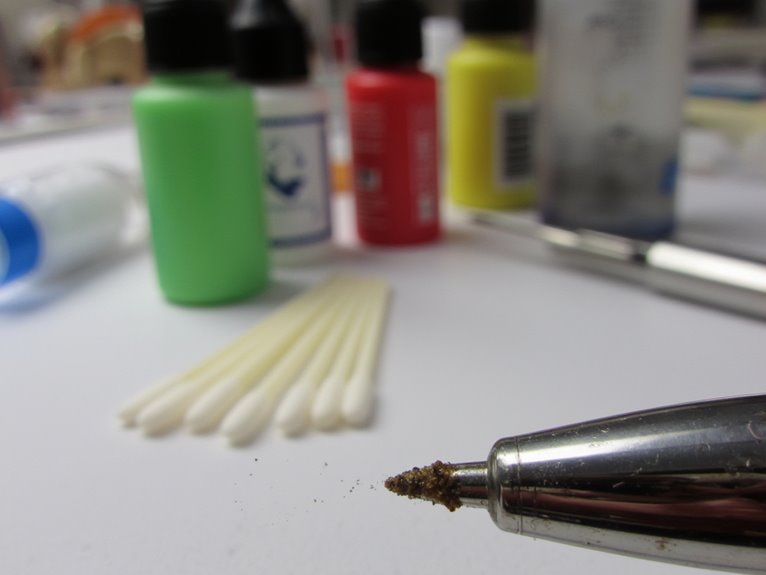
Airbrush blockages represent the most frequent technical challenge you’ll encounter during miniature painting sessions, often striking at critical moments when paint flow suddenly stops or becomes erratic.
Understanding clogging causes helps you prevent most issues before they occur. Dry paint buildup inside the needle, nozzle, or barrel creates the primary blockage source. Insufficient paint thinning compounds this problem by creating viscous mixtures that can’t flow through narrow passages.
Pre-wet your airbrush with thinner before loading paint to lubricate internal components. Maintain consistent thinning ratios and flush regularly during painting sessions.
When clogs develop, appropriate cleaning solutions like dedicated airbrush cleaners or compatible solvents dissolve dried paint effectively. Disassemble your airbrush completely after each session, soaking components in cleaner to remove stubborn residues and maintain peak performance.
Managing Overspray and Maintaining Fine Details
Managing overspray becomes critical when you’re working on detailed miniature features where unwanted paint can destroy hours of careful work.
Effective overspray techniques require precise air pressure control at 10 PSI or lower. Detail preservation depends on maintaining proper distance and angling your airbrush beyond 45 degrees from the surface.
Precision airbrush control at 10 PSI or below with proper angling prevents overspray damage on delicate miniature details.
Essential overspray management strategies include:
- Air pressure reduction – Keep PSI at 10 or below for controlled application
- Strategic positioning – Work closer to miniatures with angled spray patterns
- Masking protection – Use tapes and stencils around sensitive areas
- Paint consistency – Thin paint properly for improved flow control
- Gradual layering – Build details through thin, controlled applications
Fine-tip airbrushes enable precision work through dagger stroke techniques.
Maintaining steady hand control while working close guarantees sharp edge definition without compromising surrounding details.
Building Skills Through Progressive Practice Techniques
Mastering airbrush control doesn’t happen overnight-it requires systematic practice that builds from basic techniques to advanced applications.
Start with terrain pieces before moving to miniatures. The larger surface area provides better control development. Practice creating consistent dots by holding your airbrush close and using quick paint bursts while maintaining airflow.
Progress to smooth line exercises. Begin motion before spraying and continue after to prevent paint buildup at endpoints. Vary distance and paint volume to control line width-closer proximity with less paint produces finer results.
Advance to smooth highlighting and advanced blending techniques for natural light simulation.
Remember that precision detailing still requires brushwork for edge highlights. Combine airbrush base coats with detailed brush finishing for best results.
On a final note
You’ve now mastered the essential airbrush techniques for miniature painting. Practice consistently with different paint viscosities and pressure settings to refine your control. Start with larger surfaces before attempting fine detail work. Clean your equipment thoroughly after each session to prevent clogs. Remember that airbrushing complements traditional brush techniques rather than replacing them entirely. Your miniatures will show dramatic improvement as you apply these technical skills systematically.