We are supported by our audience. When you purchase through links on our site, we may earn an affiliate commission, at no extra cost for you. Learn more. Last update on 30th June 2025 / Images from Amazon Product Advertising API.
You’re likely experiencing primer problems because you’re applying thick coats that obscure fine details, spraying too close to the miniature, or working in poor environmental conditions. Thick primer fills recessed areas and rounds sharp edges, creating plastic-like surfaces with reduced paint adhesion. Temperature extremes above 80°F or below 50°F, humidity over 60%, and overworking your brush all contribute to uneven coverage, bubbling, and texture loss. Proper technique requires thin coats applied 10-12 inches away in ideal conditions to preserve your miniature’s intricate details and guarantee long-lasting results.
Notable Insights
- Poor primer application through thick coats obscures fine details and reduces paint adhesion on miniatures.
- Temperature extremes and high humidity during priming cause uneven coverage, bubbling, and adhesion failures.
- Overpriming creates rough textures and brittle surfaces that crack and flake during handling.
- Using incompatible primers for miniature materials leads to sticky surfaces and detail loss.
- Fix primer problems by light sanding after complete drying and reapplying thin, controlled coats.
Common Mistakes That Ruin Your Miniature’s Detail
Precision in miniature painting depends on avoiding fundamental errors that compromise detail and visual impact. Poor primer application destroys fine surface details through excessive coating techniques. You’ll obscure crisp edges and recessed areas when applying primer too thickly.
Common misconceptions include believing all primer types perform equally—acrylic primers offer better detail preservation than enamel alternatives. Maintaining proper spraying distance of 10-12 inches from the surface prevents uneven coverage and texture problems.
Essential preparation steps involve thorough cleaning and proper primer selection based on material compatibility. Use quality brushes during primer application, maintaining consistent thin coats. Multiple light applications preserve sculptural definition better than single heavy coats. Paint without primer tends to peel off easily when handled during gaming sessions. A good primer smooths surface imperfections that would otherwise show through your final paint job.
Inadequate brush usage during priming creates texture inconsistencies that affect subsequent paint adhesion. Your detailing methods suffer when primer obscures the miniature’s original surface definition, making precise highlight and shadow work nearly impossible to execute effectively.
Why Thick Primer Coats Are Your Worst Enemy
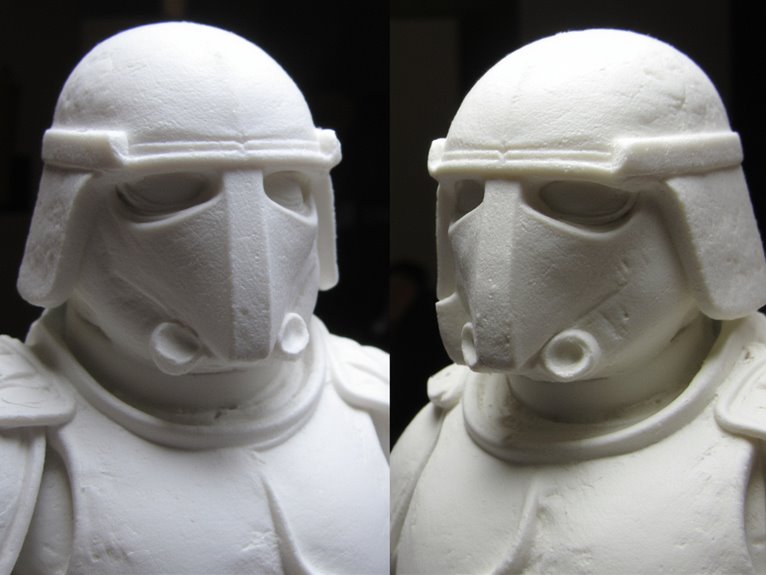
When you apply primer too thickly, you’re fundamentally burying the miniature’s crafted details beneath an unnecessary layer of material that undermines everything the sculptor intended.
Thick primer fills fine lines and rounded edges, causing sculpted features to lose their sharpness and definition. This details loss creates visually flatter miniatures that lack the crisp appearance essential for quality paint jobs.
Beyond aesthetic problems, thick coats create smooth, plastic-like surfaces that reduce paint adhesion. Your acrylics need slightly rough texture to grip effectively. Like archaeological artifacts that require careful preservation of surface details, miniatures demand meticulous documentation of their original sculptural elements through proper priming techniques. Excessive primer also extends drying times exponentially, slowing your entire workflow while wasting material and money.
Proper technique requires thin, controlled applications. Hold spray primer 6-12 inches away, using short bursts and sweeping motions. Allow each coat to dry completely before applying the next. The ideal thin coat should be semi-transparent, revealing the underlying surface rather than completely obscuring it. Professional-grade primers maintain their fast-drying properties even in thin applications, preserving detail while ensuring proper paint adhesion.
The Hidden Dangers of Overworking Your Brush
When you repeatedly work your brush over the same primer area, you’re creating three critical problems that’ll ruin your miniature’s foundation.
Your brush strokes begin leaving visible texture marks in the primer surface, while simultaneously lifting and removing the coverage you just applied.
This constant reworking produces uneven application patterns that create thick spots in some areas and bare patches in others. If these areas require repair, ensure clean, dry surfaces before applying any adhesive to reattach loose components that may have been damaged during the priming process. This excessive repetitive motion, often called licking the painting, transforms what should be confident primer application into destructive overworking that compromises your miniature’s base layer.
The ideal paint consistency should be achieved with a damp brush, ensuring your primer flows smoothly without becoming too watery or maintaining excessive thickness that leads to texture buildup.
Brush Stroke Texture Issues
Although you might perfect your primer application and choose the highest-quality paints, brush stroke texture issues can still destroy your miniature’s finish if you’re overworking your brush.
Proper brush care prevents most texture problems. Load paint only on the front 15-50% of your brush belly to maintain control. Store brushes tip-down and clean them thoroughly after each session to preserve bristle integrity.
Paint viscosity directly affects stroke quality. Thicker paints require lighter touch, while overly thinned paints create runs and pooling. Maintaining brush tip sharpness is essential for achieving the precision needed in detailed work and preventing unwanted texture variations.
Common causes of texture issues include:
- Overloading brushes beyond the front half of the belly
- Using wrong brush sizes for specific areas
- Repeatedly stroking the same spot
- Poor ferrule maintenance causing bristle splitting
Replace brushes showing frayed tips immediately. Clean bristles frequently during painting sessions to maintain consistent paint flow and prevent texture irregularities.
Coverage Removal Risks
Three critical brush strokes can destroy hours of careful primer work in seconds.
Overworking risks escalate dramatically when you repeatedly brush the same area. Mechanical abrasion thins primer layers with each pass, eventually exposing bare material underneath.
Your brush becomes a weapon against primer maintenance when conditions aren’t ideal. Primer applied in high humidity or extreme temperatures creates fragile surfaces vulnerable to removal. Thin coats cure improperly, making them susceptible to lifting under pressure.
Stiff bristles intensify damage compared to soft alternatives. Vigorous scrubbing to correct imperfections often removes more primer than it fixes. The result? Patchy adhesion zones where paint will eventually chip and flake.
Gentle motions preserve primer integrity. Allow full curing time before additional work. Your miniature’s longevity depends on respecting primer boundaries.
Uneven Application Patterns
Single brush strokes create microscopic ridges across primer surfaces, but excessive passes amplify these imperfections into visible streaks that compromise your miniature’s foundation.
Overworking disrupts the drying film and creates uneven thickness patterns that show through subsequent paint layers.
Proper brush loading prevents most application issues:
- Load brushes with adequate paint quantity to minimize repeated strokes
- Maintain wet edges to avoid lap marks and surface disruption
- Work in long, smooth motions following miniature contours
- Allow natural leveling without forced manipulation
Application techniques directly impact primer adhesion.
Excessive brushing weakens bonding by reactivating dry layers and creating microscopic surface roughness.
Variable solvent evaporation rates cause uneven drying patterns. These irregularities affect detail visibility and create glossiness inconsistencies that reduce professional finish quality.
How Weather Conditions Sabotage Your Priming Results
Weather conditions create more priming failures than any other single factor in miniature painting.
Temperature extremes above 80°F or below 50°F will ruin your primer finish—high heat causes paint to cure mid-air creating bubble textures, while cold weather prevents proper adhesion and curing.
Humidity levels above 60% and wind speeds exceeding light breezes turn perfect primer application into a frustrating mess of uneven coverage and contaminated surfaces.
Humidity and Temperature Effects
Although primer application might seem straightforward, environmental conditions can transform a simple priming session into a frustrating disaster.
Temperature stability and humidity control directly determine your primer’s final quality and adhesion performance.
Your ideal priming window requires specific environmental parameters:
- Temperature range: 50°F to 90°F (10°C to 32°C) for consistent spray performance
- Humidity levels: Below 50-60% relative humidity to prevent texture defects
- Solvent evaporation: Proper ambient conditions facilitate uniform coverage
- Curing time: Stable conditions prevent tacky or uneven coats
Temperatures below 50°F cause slow drying and potential runs. Above 90°F creates rapid drying with poor adhesion.
Humidity exceeding 70% produces rough “pebbled” finishes and beading issues.
Cold conditions combined with high moisture create the worst scenario—slow curing, surface imperfections, and eventual primer failure.
Wind and Airflow Issues
When you step outside with a spray can on a breezy day, you’re fundamentally fighting an invisible enemy that’ll sabotage every aspect of your priming session. Wind carries paint particles off-target, creating patchy coverage and wasteful overspray. Dust, pollen, and debris stick to wet primer surfaces, producing rough finishes that obscure fine model details.
Effective airflow management requires understanding wind direction before you begin spraying. Position yourself upwind from your models to control particle drift. Test wind speed by observing lightweight objects or checking weather apps—anything above 5 mph compromises spray patterns considerably.
Create windbreaks using cardboard shields or work in sheltered areas like garages with doors partially open. Plan priming sessions during early morning or evening hours when atmospheric conditions are typically calmer and more predictable.
When Multiple Coats Become Counterproductive
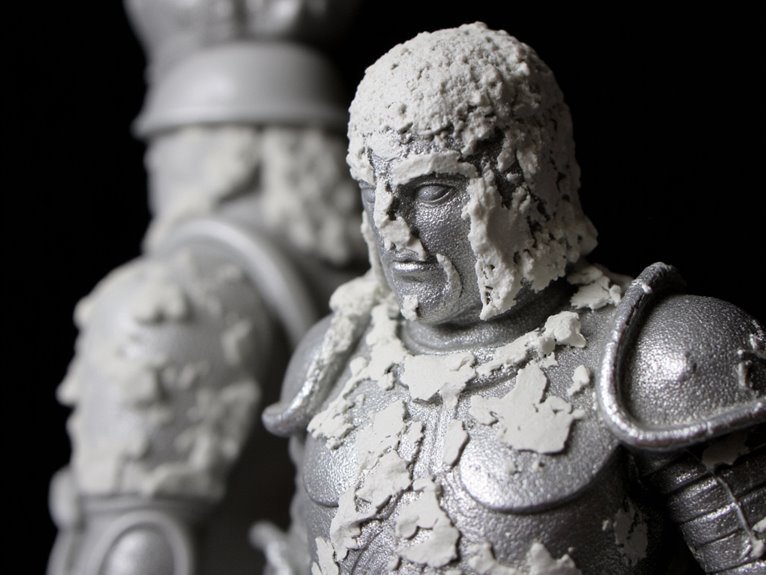
Consider these counterproductive effects of overpriming:
- Rough, uneven textures that prevent proper paint adhesion
- Brittle surfaces prone to cracking and flaking during handling
- Loss of fine detail resolution essential for miniature realism
- Extended drying times increasing contamination risks
You’ll achieve superior results using one or two thin, even coats instead of multiple thick applications. Proper surface preparation before priming is essential for optimal primer effectiveness and prevents the need for excessive coats.
Choosing the Wrong Primer Type and Paying the Price
You’ll discover that selecting an incompatible primer creates a cascade of expensive problems that extends far beyond the initial purchase price.
Material compatibility issues between your primer and miniature surface can cause complete adhesion failure, forcing you to strip and restart your entire project.
The false economy of budget primers often costs triple the time and materials when poor formulations require multiple corrective coats or complete do-overs.
Professional miniature primers require minimum adhesion ratings of 400-600 PSI pull-off strength to prevent the costly failures that plague hobbyists using general-purpose alternatives.
Material Compatibility Issues
Although choosing the right primer might seem like a minor detail in the miniature painting process, selecting an incompatible primer type can destroy your carefully assembled models and waste hours of preparation work.
Material identification determines which primers you can safely use. Resin miniatures react poorly to solvent-based spray primers, developing sticky surfaces or melted details. Plastic tolerates most formulas but suffers detail loss from thick automotive primers. Metal requires specific adhesion promoters for ideal bonding.
Key compatibility warning signs include:
- Sticky or tacky surfaces after primer application
- Visible melting, warping, or cracking of miniature features
- Primer beading up instead of coating evenly
- Excessive detail loss from overly thick coverage
Always conduct primer testing on spare parts before full application. This simple step prevents costly material damage.
Poor Adhesion Consequences
When you select the wrong primer for your miniature’s material, the consequences extend far beyond a simple do-over. Adhesion challenges manifest immediately as paint layers become fragile and chip from minor handling.
You’ll notice visible substrate exposure through thin coverage, degrading your miniature’s appearance considerably. Primer effectiveness drops when incompatible chemistry causes shrinkage, bubbling, or flaking defects post-application.
The financial impact compounds quickly. Primer flaking necessitates complete figure restoration, increasing project time and material costs greatly.
You’ll consume more primers and paints without achieving desired results. Poor adhesion reduces long-term durability as paint delaminates under environmental stress or mechanical impact.
Detail definition suffers when peeling primer interferes with subsequent layers and shading techniques, ultimately compromising your miniature’s usability for tabletop gaming or display purposes.
Quality Vs Budget
Since budget constraints often drive primer selection decisions, many hobbyists discover that choosing cheaper alternatives creates far more expensive problems than they initially saved.
Your price sensitivity might lead you toward low-cost options, but these primers typically require 40-60% more product for adequate coverage.
Budget primers create cascading expenses through multiple applications and frequent repainting. Primer innovation in higher-quality formulations offers superior coverage ratios and durability that offset initial costs:
- Poor coverage demands multiple thin coats, tripling paint consumption
- Rough surfaces from cheap primers obscure fine details permanently
- Inadequate adhesion causes premature chipping within months
- Environmental degradation requires complete repainting projects
Quality primers provide matte finishes with superior self-leveling properties.
Their enhanced flexibility prevents cracking across different base materials while maintaining microscopic texture for ideal paint adhesion.
The Consequences of Poor Primer Application
Poor primer application creates cascading problems that compromise every subsequent stage of miniature painting. When you apply excessive primer thickness, you’ll obscure fine sculptural details and create brush marks or streaks.
These thick layers produce a plastic-like finish that interferes with paint adhesion. Your miniature loses its crisp edges and engraved textures as primer pools in recessed areas.
Adhesion issues emerge when primer isn’t properly mixed or applied over contaminated surfaces. You’ll experience paint flaking and chipping during normal handling.
Poor environmental conditions during application cause primer to cure incorrectly, leading to bubbling or separation later.
Visual consequences include unexpected blotches, uneven paint coverage, and compromised color vibrancy. Your final painted miniature appears amateur despite skilled brushwork.
Essential Techniques for Flawless Primer Coverage
Four fundamental techniques form the foundation of professional primer application: proper spray distance, environmental control, thin coat layering, and strategic color selection.
Maintain your spray distance at 20-30 cm from the miniature’s surface. This distance guarantees uniform coverage without pooling. Use short bursts rather than continuous spraying to control application thickness.
Environmental factors directly impact primer consistency. Cold temperatures thicken primer, while excessive humidity prevents proper adhesion. Submerge your aerosol can in lukewarm water during cold conditions to maintain the best primer flow.
Apply multiple thin coats instead of single heavy applications:
- Shake the can vigorously before each use
- Allow complete drying between coats
- Turn miniatures to reach all surfaces
- Stop when surface shininess disappears
Choose contrasting primer colors like white or black on gray resin to monitor coverage effectively.
Selecting the Right Primer for Different Miniature Materials
Why does primer selection matter when different miniature materials demand specific adhesion properties? Each material requires different bonding characteristics to prevent paint failure.
Plastic miniatures work best with acrylic primers offering flexibility and strong adhesion. The Army Painter Color Primer provides 24+ color options for spray primer selection, integrating base coats efficiently.
Acrylic primers deliver the flexibility and strong adhesion essential for plastic miniature painting success.
Vallejo Grey Primer delivers brush on advantages through precise control and smoother application on detailed models.
Resin surfaces need primers that bond to porous materials. Acrylic polyurethane primers offer ideal coverage without obscuring details.
Vallejo Surface Primer’s fine consistency prevents detail loss.
Metal miniatures require primers bonding to non-porous surfaces. Clean preparation is essential.
Badger Stynylrez provides superior adhesion preventing paint flaking. Apply in short bursts from twelve inches away to preserve details.
Creating Optimal Environmental Conditions for Priming
Although proper primer selection forms the foundation of successful miniature painting, environmental conditions during application determine whether that primer performs as intended. You’ll achieve excellent results when the ideal temperature stays between 15°C and 27°C (60°F to 80°F).
Surface preparation becomes compromised outside this range, causing rough textures or powdery finishes.
Critical environmental factors for successful priming:
- Humidity control below 85% prevents bubbling and adhesion failures
- Airflow optimization through ventilation dissipates fumes while preventing dust contamination
- Spray distance of 30-40cm (12-16 inches) adjusted for temperature conditions
- Workspace setup using protected areas like cardboard boxes for overspray management
You must wear protective gear including masks and gloves when priming indoors.
Proper environmental control transforms problematic applications into consistent, professional results.
Fixing Primer Disasters Before They Ruin Your Paint Job
Even when you’ve mastered environmental controls, primer disasters can still occur and threaten your entire paint job.
Thick primer layers require complete drying followed by light sanding with fine-grit paper. Remove excess buildup without damaging surface details. Over-brushed areas need spray or airbrush reapplication to restore smooth texture. Avoid disturbing wet primer through multiple brush passes.
Thin multiple coats prevent primer disasters better than attempting to fix thick, uneven layers through sanding and reapplication.
Poor adhesion demands thorough cleaning with isopropyl alcohol before re-priming. Lightly scuff existing surfaces to improve bonding. Strip failed layers chemically when necessary. Inspect primed surfaces under bright lighting to identify bubbles, pooling, or bare spots immediately.
Effective primer application uses thin, multiple coats rather than single heavy layers. Allow complete curing between applications.
Adhesion improvement comes from proper surface preparation and compatible primer selection for your miniature’s base material.
On a final note
You’ve learned the critical factors that determine primer success on miniatures. Thin coats remain essential—never exceed 15-20 microns per application. Control your environment: maintain 65-75°F temperatures with 40-60% humidity levels. Choose primers matched to your substrate material, whether resin, metal, or plastic. Don’t rush the process—proper drying time between coats prevents adhesion failures. Apply these techniques consistently, and you’ll achieve professional-grade primer coverage that enhances detail rather than obscuring it.