We are supported by our audience. When you purchase through links on our site, we may earn an affiliate commission, at no extra cost for you. Learn more. Last update on 30th June 2025 / Images from Amazon Product Advertising API.
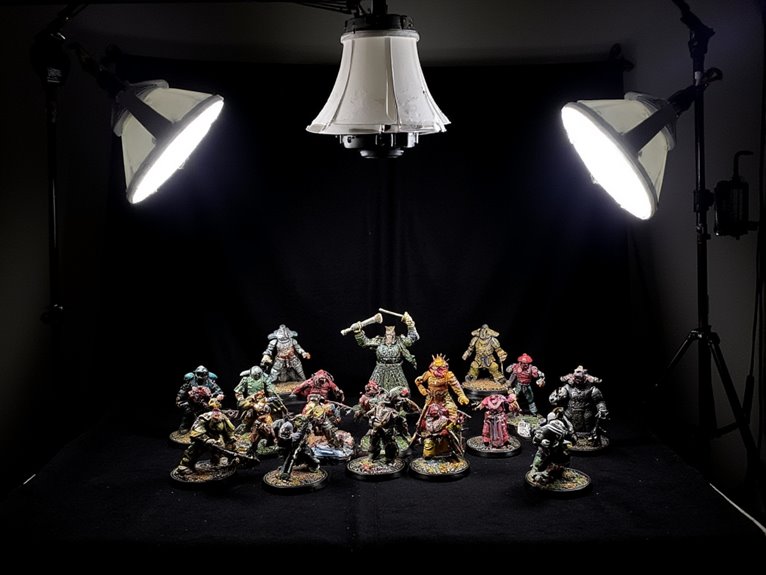
You’ll need a DSLR or mirrorless camera with a macro lens, preferably 105mm, positioned 30 centimeters above your miniature at a slight upward angle. Build a light box using cardboard lined with white paper, then position LED lights at 45-degree angles with minimum 800 lumens and CRI above 90. Set your aperture between f/11-f/16, keep ISO at 100, and use matte white poster board for seamless infinity curve backgrounds. This foundation guarantees sharp, well-lit results that showcase your painting techniques with professional clarity.
Notable Insights
- Use a DSLR or mirrorless camera with macro lens, aperture f/11-f/16, and ISO 100 for sharp miniature details.
- Build a light box with white paper lining and position LED lights at 45-degree angles for even illumination.
- Create infinity curve backgrounds using matte poster board to eliminate reflections and provide seamless professional appearance.
- Position camera 30 centimeters above miniature on stable tripod with slight upward angle for dynamic composition.
- Process RAW files with global adjustments for exposure and contrast, using focus stacking for maximum sharpness.
Essential Camera Equipment and Lens Selection
When selecting a camera for miniature photography, your choice of equipment directly impacts the quality and detail captured in your final images. DSLRs remain the preferred option, offering at least 12 megapixels and essential manual controls for precise adjustments.
Mirrorless cameras provide similar functionality as viable alternatives. Entry-level DSLRs or used models deliver excellent value for beginners seeking enhanced control without significant investment.
Your lens choices prove equally critical. Macro lenses excel at capturing intricate miniature details, with 105mm being the standard recommendation.
These specialized lenses offer superior sharpness and working distance compared to kit or 50mm alternatives. Prime lenses with macro capability consistently outperform zoom lenses in this application.
The shallow depth of field requires apertures of f8 or higher to maintain complete miniature focus. For optimal image quality, use apertures between f10 – f16 as recommended for miniature photography. Setting your ISO to ISO100 helps minimize unwanted noise and produces cleaner, sharper images with better detail retention.
Building Your Light Box Environment
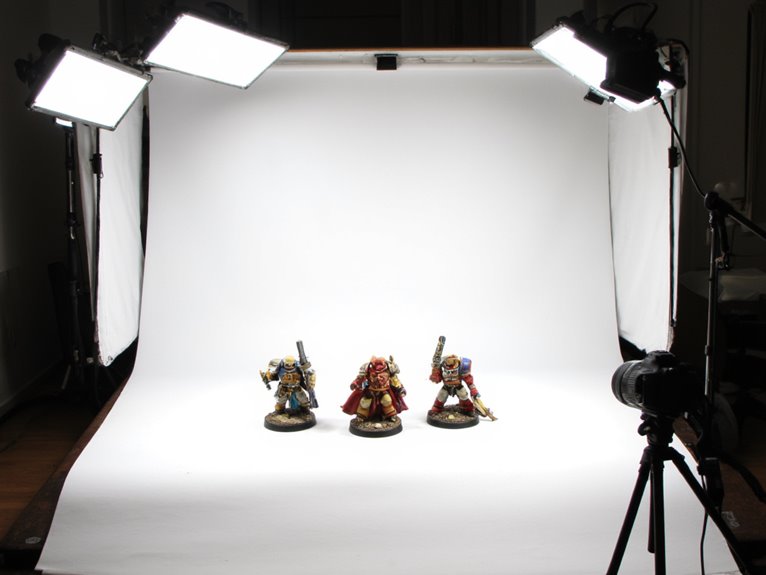
You’ll need to construct a controlled lighting environment that eliminates harsh shadows and provides even illumination across your miniature’s surface details.
The foundation starts with selecting appropriate materials for your light box construction, strategically positioning LED light sources to achieve ideal diffusion, and creating seamless infinity curve backgrounds that won’t distract from your subject. A permanent setup allows for quick access and minimal preparation time, eliminating the time-consuming assembly that often reduces motivation for regular photography sessions. Light distance from your miniatures directly affects shadow hardness, with closer positioning producing the softer lighting effects essential for capturing fine paint details.
These three elements work together to transform inconsistent ambient lighting into a professional photography setup that captures paint work with accurate color reproduction and sharp detail definition.
Choosing Light Box Materials
Building an effective light box for miniature photography starts with selecting the right structural foundation, and cardboard boxes offer the most practical combination of accessibility, affordability, and workability for most hobbyists.
Your light box design depends on proper material selection that balances functionality with budget constraints.
White paper serves as your primary interior lining material, creating reflective surfaces that enhance light diffusion throughout the box. You’ll need sticky tape and cutting tools like craft knives for assembly and modifications.
Translucent materials such as sticky back plastic or layered white paper act as effective diffusers when positioned over light sources or windows. For assembly connections, binder clips provide a reliable method to join frame sections while maintaining structural stability during photography sessions.
Choose cardboard thickness that maintains structural integrity during use. Lightweight materials facilitate portability while providing adequate durability for repeated photography sessions. Remove all box tabs during preparation to ensure clean edges and professional appearance for your finished light box.
Positioning LED Light Sources
Proper LED placement transforms your completed light box from a basic enclosure into a professional photography environment that captures miniature details with stunning clarity.
Position your LEDs at 45-degree angles from the front-left and front-right positions. This light positioning creates even illumination while revealing texture and depth. You’ll need at least 800 lumens per light source with a CRI above 90 for accurate color representation.
Use multiple light sources to fill shadows without flattening your miniature’s appearance. Avoid direct overhead lighting alone, as it creates harsh shadows that obscure detail. Consider using diffusers to achieve softer lighting that maintains detail while reducing harsh shadow edges.
Ring lights positioned frontally provide shadow-free illumination for fine details. Make angle adjustments based on your miniature’s features and reflective surfaces.
Keep lights close enough for brightness but distant enough to prevent hotspots or unwanted glare.
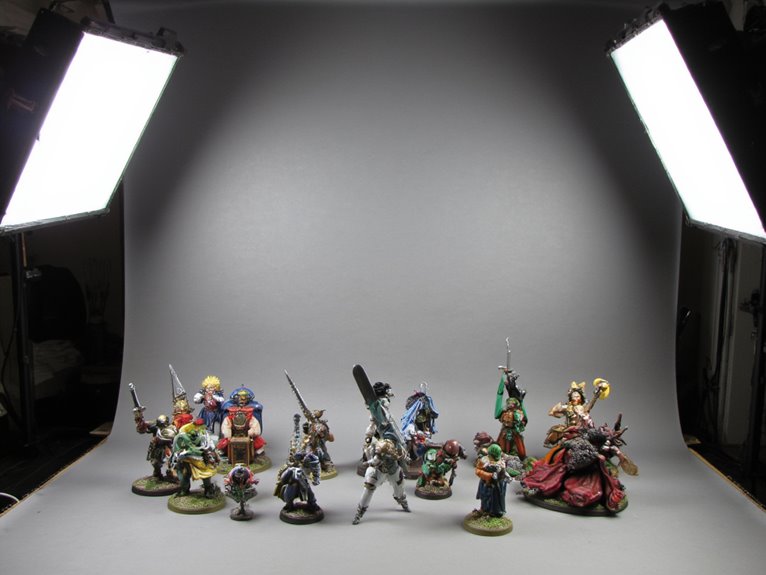
Creating Infinity Curve Backgrounds
While LED positioning provides excellent illumination for your miniatures, the background behind your subject determines whether your photos look amateur or professional.
Creating infinity curve techniques transforms ordinary setups into clean, distraction-free compositions. You’ll need a large sheet of poster board taped to your vertical surface, then curved smoothly onto your table surface. The seamless backdrop design eliminates harsh corners that break visual flow.
Matte white surfaces work best for light control and neutral backgrounds. Verify your curve remains smooth without visible creases or tape lines.
Position your camera at eye level with the miniature to maximize the infinity effect. Use f/5 aperture settings to keep backgrounds softly blurred while maintaining subject sharpness.
Strategic Lighting Placement and Techniques
You’ll need to position multiple light sources strategically to eliminate the harsh shadow zones that can obscure your miniature’s painted details.
Proper LED angle positioning becomes critical when you’re working with Object Source Lighting (OSL) effects, where your painted glow areas must align with actual light placement to maintain the illusion.
The key is balancing your primary overhead light with secondary fill lights positioned at 45-degree angles, ensuring that shadows fall naturally without contradicting the directional lighting effects you’ve painted onto the miniature.
Multiple Light Source Setup
Multiple light sources transform flat, lifeless miniature photographs into dynamic images that showcase every carefully painted detail.
You’ll need at least two lights positioned at 45-degree angles from your miniature for ideal light source positioning. Place your primary key light to define form and texture, then add a secondary fill light on the opposite side. This setup creates essential shadow control techniques that reveal depth without harsh contrasts.
Position a backlight behind your miniature to highlight edges and separate it from the background. Adjust each light’s height and distance to control shadow length and intensity.
Avoid direct overhead lighting—it flattens features and creates unwanted facial shadows. Multiple sources working together reveal your miniature’s true three-dimensional form and paint subtleties.
Eliminating Harsh Shadow Zones
Harsh shadows can destroy even the most meticulously painted miniature by obscuring critical details and creating distracting dark zones that flatten your subject’s dimensional appearance.
Effective shadow manipulation techniques start with strategic diffuser placement between your light source and miniature. Position parchment paper or tracing paper 6-12 inches from your light to create softer illumination.
Light diffusion strategies work best when combined with white foam board reflectors positioned opposite your main light source. Adjust reflector angles to bounce fill light into shadow areas without creating secondary shadows.
Increase your light-to-subject distance to naturally soften shadows through larger apparent light source size. Remember the inverse square law: doubling distance reduces intensity to one-quarter, requiring brightness compensation while achieving gentler shadow changes.
LED Angle Positioning
Once you’ve tamed unwanted shadows through proper diffusion, your next challenge becomes positioning LED lights at precise angles that reveal every painted detail without creating new lighting problems.
Position your LEDs approximately 45 degrees off to the side from your camera axis. This prevents direct reflections and eliminates glare on metallic surfaces. Angle your lights 45 degrees above the tabletop for balanced illumination that models texture effectively.
Keep LEDs close enough to maintain brightness but outside your camera frame. Multiple LED sources let you illuminate different facets while reducing shadows.
Turn off overhead lighting to maintain controlled angles and prevent color contamination.
These LED positioning techniques and light angle adjustments create dimensional depth while preserving color accuracy across your miniature’s painted surfaces.
Background Setup and Surface Preparation
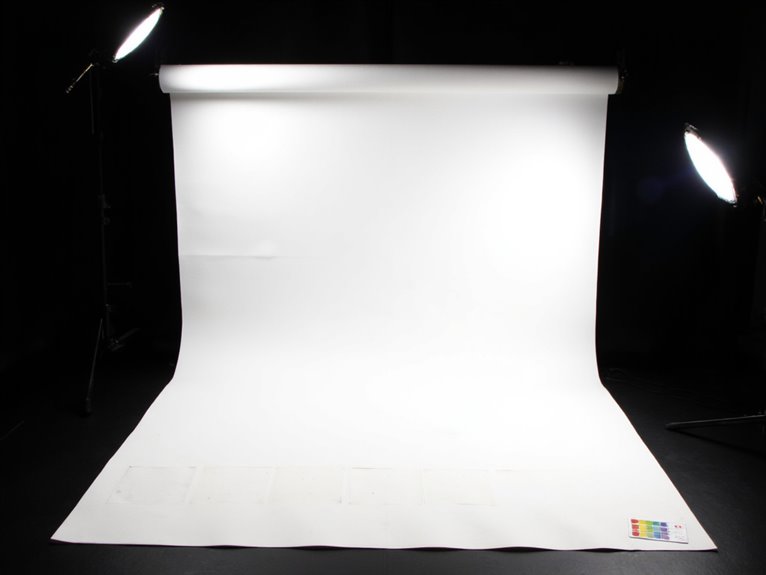
When setting up backgrounds and surfaces for miniature photography, your material choices directly impact the final image quality and visual appeal. Select matte backdrop materials like poster boards or regular paper to eliminate reflections. Black backgrounds provide superior color contrast, while white offers clean presentation.
Position your backdrop far enough from the miniature to prevent shadows and maintain lighting control. Curved backgrounds eliminate visible edges and create seamless shifts. Use non-reflective surfaces under miniatures to minimize glare.
| Background Color | Visual Impact |
|---|---|
| Black | Dramatic contrast |
| White | Clean, professional |
| Gray | Neutral balance |
| Colored | Thematic matching |
| Gradient | Depth illusion |
Ensure backgrounds receive less illumination than your subject. DIY setups using taped paper or lightbox interiors work effectively for budget-conscious photographers.
Optimal Camera Settings for Miniature Detail
Your camera settings directly determine whether you’ll capture sharp, detailed images or lose critical paint work and textures in your miniatures.
The three essential elements—focus techniques, aperture control, and ISO balance—work together to maximize detail while maintaining proper exposure.
Getting these settings right means the difference between professional-quality photos and blurry disappointments.
Macro Lens Focus Techniques
Although autofocus systems perform well in standard photography, they become unreliable when shooting miniatures at macro magnifications due to the extremely narrow depth of field.
Switch your lens to manual focus mode for precise control over focal placement. These focus techniques require patience and practice to master effectively.
Adjust the focus ring slowly until your desired focal point appears sharp. Try the rocking method: set initial focus, then gently rock your camera forward and backward to fine-tune the focal plane. This technique helps achieve pinpoint accuracy on intricate details.
Manual adjustments become essential when capturing fine paintwork and textures.
Extension tubes enhance close-focusing capabilities by increasing lens-to-sensor distance without degrading image quality, allowing ultra-fine detail capture beyond standard minimum focusing distances.
Aperture and Depth Control
Since depth of field determines how much of your miniature appears sharp in the final image, aperture selection becomes the most critical camera setting for capturing extensive detail. You’ll want to use aperture settings between f/11 and f/22 for ideal results. This range maximizes sharpness while keeping diffraction minimal.
Smaller apertures like f/16 increase depth calculation considerably, ensuring weapons, bases, and fine paint details remain crisp. However, you’ll need longer exposure times due to reduced light intake. A tripod becomes essential at these settings to prevent camera shake during extended exposures.
Avoid apertures beyond f/22, as diffraction softens your images. Balance is key—sufficient depth without sacrificing overall sharpness.
Combine proper aperture settings with adequate lighting to compensate for the reduced light transmission through smaller openings.
ISO and Exposure Balance
While aperture controls depth of field, ISO and exposure time work together to determine your miniature’s overall image quality and detail preservation. Start with ISO 100 to minimize grain and maintain sharp paint detail visibility.
This setting preserves fine textures without digital noise interference that degrades close-up shots. Your ISO techniques should prioritize low sensitivity when lighting conditions permit. Pair ISO 100 with 1/60s shutter speed for balanced exposure without camera shake.
Use tripod mounting to enable longer exposures at low ISO settings. Effective exposure strategies require coordinating ISO with lighting setup. Bright directional lighting at 45° angles allows maintaining ISO 100 while preventing underexposure.
Manual mode gives complete control over these settings. Increase ISO only when lighting fails, accepting potential detail loss for proper exposure balance.
Tripod Positioning and Stability Considerations
When photographing miniatures, your tripod’s position determines whether you’ll capture flat, lifeless images or dynamic shots that showcase three-dimensional depth and detail.
Position your camera slightly above the miniature at approximately 30 centimeters distance. This angle avoids boring flat perspectives while capturing base details effectively. Aim for the miniature’s “golden angle” – typically achieved by setting your tripod lower and shooting upward slightly for dynamic portrait-style results.
Tripod type selection matters less than stability. Even cheap plastic tripods work if they eliminate camera shake at slower shutter speeds. Lock all joints firmly after adjustment to prevent wobbling from table vibrations.
Your tripod enables consistent composition through live view positioning and facilitates focus stacking with identical angles. Coordinate tripod height with lighting placement, ensuring front-and-above illumination without harsh reflections.
Tripod maintenance tips include checking joint locks and using anti-slip feet for workspace stability.
Managing Shadows and Eliminating Glare
Shadows and glare represent the two most common technical obstacles that convert promising miniature shots into frustrating failures.
Proper shadow layering requires strategic light positioning above and slightly forward of your subject. You’ll eliminate harsh changes by placing multiple dimmed sources at different angles rather than relying on one bright light.
Effective glare reduction demands careful surface management and diffusion techniques:
- Position diffusers between lights and miniatures to soften illumination
- Use matte varnishes on painted surfaces to reduce reflective hotspots
- Place white card reflectors opposite main lights for balanced fill
- Apply polarizing filters to minimize glare from metallic finishes
- Maintain consistent distances between lights and subjects
Clean your lens thoroughly before shooting. Smudges amplify both problems greatly.
Post-Processing Workflow for Enhanced Results
Capturing sharp, well-lit images marks only the beginning of the miniature photography process.
You’ll need a systematic post-processing workflow to maximize your results.
Import RAW files directly into Lightroom or Photoshop for maximum editing flexibility.
Start with global adjustments: correct exposure, white balance, and contrast first.
Begin every miniature photo edit with the fundamentals: exposure, white balance, and contrast form your essential foundation before moving to detailed work.
Use editing shortcuts like keyboard commands to speed your workflow through repetitive tasks.
Apply localized corrections next.
Dodge and burn specific areas to enhance texture and depth.
Clone stamp tools remove dust spots without affecting painted details.
Color grading allows precise control over individual color channels, emphasizing metallic finishes or subtle paint variations.
Focus stacking combines multiple images for complete sharpness.
Use high-pass filters for final detail enhancement.
Export consistently sized files with embedded metadata for archival purposes.
Budget-Friendly Equipment Alternatives
Quality miniature photography doesn’t require expensive professional equipment. You can achieve excellent results with budget-conscious alternatives that deliver professional-grade image quality.
Medium-priced point-and-shoot cameras provide sufficient manual controls for miniature work. Entry-level DSLRs from previous model years offer superior image stabilization and manual settings at reduced prices. Compact DSLR-lite options like the Canon G12 balance control with affordability. Modern smartphones serve as viable alternatives when budget constraints exist.
Essential camera accessories include basic tripods for stability—avoid extremely cheap models that compromise image stabilization. DIY solutions using book stacks work temporarily. Timer mode reduces camera shake without expensive remote releases.
- Manual white balance and ISO 100 settings maintain accurate colors
- Affordable macro filters enhance close-up detail capture
- Homemade lightboxes using cardboard provide professional lighting
- White paper backgrounds cost pennies but deliver clean results
- Small reflectors from aluminum foil fill shadows effectively
Professional Presentation and Composition Tips
Everything about professional miniature photography hinges on mastering fundamental composition principles that transform amateur snapshots into gallery-worthy images.
Position your miniature to highlight key features like weapons and facial details. Evaluate placement through your camera lens before shooting to correct awkward angles.
Use framing techniques that reveal multiple depths and contours, exposing intricate paintwork. Study portraiture and macro photography theory to develop convincing style. Experiment with poses and angles, balancing dynamic presentation with detail clarity.
Choose clean backgrounds with strong color contrast against your miniature’s palette. Neutral tones or gradient backdrops eliminate distractions while emphasizing your subject.
Consider thematic backgrounds for enhanced visual storytelling. Control depth of field to blur backgrounds softly, keeping miniatures in sharp focus while removing environmental reflections.
Magnifying glass equipment with LED lighting can help you inspect fine details before photographing, ensuring your miniature is positioned to showcase the most intricate painted elements.
On a final note
You’ve now mastered the technical fundamentals of miniature photography. Your equipment choices, lighting setup, and camera settings directly impact image quality. The lightbox eliminates environmental variables. Proper aperture selection guarantees sharp detail across the miniature’s depth. Post-processing enhances what you’ve captured in-camera. These techniques aren’t optional—they’re requirements for professional results. Apply these methods consistently, and you’ll produce gallery-worthy images that showcase your painted miniatures with technical precision and visual impact.