
We are supported by our audience. When you purchase through links on our site, we may earn an affiliate commission, at no extra cost for you. Learn more. Last update on 30th June 2025 / Images from Amazon Product Advertising API.
Non-Metallic Metal (NMM) technique lets you create convincing metallic surfaces on miniatures using only regular paints without metallic particles. You’ll achieve this illusion through strategic light placement, sharp value contrasts, and smooth gradients between deep shadows and bright highlights. The key lies in understanding your light source direction and using thin paint layers to build crisp shifts. Essential colors include blues, earth tones, and warm highlights that simulate reflected light. Mastering this foundational approach opens doors to advanced metallic effects.
Notable Insights
- NMM creates realistic metallic effects on miniatures using only non-reflective paints without metallic flakes or particles.
- Success depends on understanding light source direction, sharp value contrasts, and smooth gradient transitions between highlights and shadows.
- Essential tools include fine detail brushes, flat basecoat brushes, and quality paint brands like Scale 75 or Vallejo.
- Apply thin layers starting with zenithal priming, then build up strategic highlights and deep shadows with crisp edges.
- Master the technique through systematic practice using geometric studies, reference copying, and progressive complexity in projects.
Understanding the NMM Technique for Miniature Painting
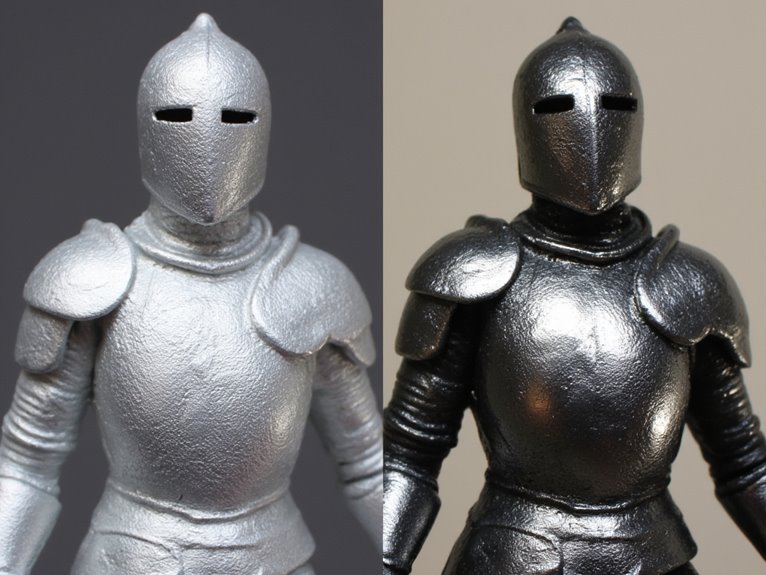
When you examine a masterfully painted miniature with gleaming armor or weapons, you’re likely looking at one of two techniques: True Metallic Metal (TMM) or Non-Metallic Metal (NMM).
NMM creates convincing metal effects using non-reflective paints exclusively. You won’t find metallic flakes or reflective pigments in this approach.
NMM history traces back to classical painting methods. Old masters like Rembrandt employed these techniques before metallic paints existed.
These artistic influences originated in traditional 2D art and comic illustration, where artists simulated metallic surfaces through careful light manipulation.
The technique operates on fundamental principles: understanding light sources, recognizing geometric volumes, and mastering value contrasts.
You’ll replicate how light interacts with metal surfaces by painting sharp highlights, smooth gradients, and deep shadows. To begin this process effectively, start by envisioning four points of light positioned around your model.
This creates the illusion of reflective surfaces without actual metallic materials. The process typically involves careful layering and blending to build up the metallic appearance gradually.
Many painters achieve the best results by using high pigmentation paints that provide excellent opacity and smooth application for creating convincing gradients.
Essential Tools and Materials for NMM Success
Success in non-metallic metal painting requires three fundamental categories of materials: specialized paints, precision brushes, and controlled lighting equipment.
Your paint selection determines the metallic illusion’s quality. Base colors include blues for cool tones and reds for warm effects. Earth tones like brown provide realistic shading without metal flake interference. Pastel shades create convincing highlights on reflective surfaces. Both Scale 75 and Vallejo offer cost-effective NMM paint sets that provide essential core colors for achieving professional results.
Different brush types serve specific functions in NMM application. Fine detail brushes deliver precise control for highlights and edge work. Flat brushes handle basecoating and broad coverage efficiently. Medical brushes offer superior tip precision for microscopic details.
Effective mixing techniques require palette knives for smooth color blending and glazing medium preparation. Airbrushes create seamless gradient shifts across large metallic areas. Ready-to-spray formulas eliminate mixing ratios and provide consistent flow characteristics for smooth gradient transitions.
Consistent studio lighting prevents color distortion during painting sessions. Reference photographs of actual metallic objects guide realistic reflection placement and shadow positioning. Metallic objects function as poor mirrors that reflect environmental light based on their surface characteristics.
Color Theory and Light Placement Fundamentals
Before you pick up your brush, you’ll need to master three critical elements that separate convincing NMM from flat, unconvincing attempts.
Understanding light source direction establishes where your brightest highlights and deepest shadows will fall across each surface angle.
Color temperature principles and contrast ratio management then determine how those highlights shift from pure white peaks to near-black shadow valleys, creating the illusion of reflective metal through paint alone. Complementary colors positioned opposite each other on the color wheel can create high-contrast schemes that make your metallic surfaces appear more dynamic and visually striking.
Warm colors like red and orange naturally advance toward the viewer while cool blues and greens recede, helping establish the dimensional qualities essential for realistic metal rendering.
Understanding Light Source Direction
Three fundamental principles govern light source direction in non-metallic metal painting: establishing a primary light source, maintaining consistent shadow angles, and creating believable highlight placement across all surfaces.
Your light intensity determines shadow dynamics across the miniature. Position your light source at a 45-degree angle from above to simulate natural lighting conditions. This placement creates realistic shadow falloff while maintaining visual coherence from multiple viewing angles. Light travels in straight lines and its strength decreases with distance from the source.
Follow these critical steps for proper light direction:
- Establish primary source – Choose one dominant light direction and stick to it
- Map shadow angles – Guarantee all recesses receive consistent shadow placement
- Place strategic highlights – Position bright spots where light would naturally catch edges
- Verify consistency – Rotate your miniature to check light logic from all sides
Forced shadow theory amplifies these natural light patterns for enhanced visual impact.
Color Temperature Principles
Understanding color temperature transforms your non-metallic metal painting from flat surfaces into convincing reflective materials. Your color perception determines whether metals appear believable or artificial.
Warm colors create the illusion of gold, bronze, and copper surfaces. Cool colors simulate steel, silver, and iron. The temperature influence on your highlight and shadow choices directly affects realism.
| Metal Type | Base Temperature | Highlight Temp | Shadow Temp |
|---|---|---|---|
| Steel/Silver | Cool | Cool-neutral | Warm-neutral |
| Gold | Warm | Warm-bright | Cool-dark |
| Copper/Bronze | Warm-orange | Warm-yellow | Cool-brown |
| Iron | Cool-gray | Cool-white | Warm-brown |
Cool light sources produce warm shadows and cool highlights. Warm light sources reverse this relationship. Master temperature contrasts to achieve sharp, reflective shifts rather than muddy gradients.
Contrast Ratio Management
When painting non-metallic metals, contrast ratio determines the difference between convincing reflective surfaces and flat, unconvincing results. You’ll need strong gradients from deep shadows to bright highlights while avoiding even mid-tone distribution.
Dynamic adjustments based on metal type enhance realism—silver requires broader contrast ranges than weathered iron.
Essential contrast management steps include:
- Map light placement mentally before applying any paint layers
- Concentrate values toward highlights and shadows, minimizing mid-tones
- Build tonal shifts gradually using glazes and opaque highlights
- Maintain consistent light angles across all miniature surfaces
Your primer color affects contrast perception throughout the painting process.
Zenithal priming establishes basic zones but lacks separation between parts. Layer translucent glazes to preserve depth while adding opaque highlights for visual impact.
Document your intended viewing angles to guarantee realistic lighting effects.
Step-by-Step NMM Painting Process
You’ll execute NMM painting through a systematic three-stage process that builds metallic illusion through careful color placement.
Start by establishing your base color as the foundation, then methodically add shadows to create depth before applying highlights to simulate light reflection.
This structured approach guarantees you maintain consistent light direction while building the sharp tonal contrasts essential for convincing metallic surfaces.
Base Color Application
Apply your chosen base color with deliberate precision to establish the foundation for your non-metallic metal effect. Proper basecoat consistency requires multiple thin layers rather than single thick applications.
Paint dilution with water maintains detail visibility while ensuring smooth coverage across all metallic surfaces. Your application technique determines the quality of subsequent highlight layers:
- Thin wash application – Dilute paint to translucent consistency for even coverage
- Dry brush technique – Use minimal paint on brush to prevent detail obscuration
- Multiple layer building – Apply 2-3 coats for uniform opacity and color depth
- Edge definition – Maintain crisp boundaries between metallic and non-metallic areas
Focus on complete coverage without brush stroke accumulation. Each layer must dry completely before proceeding to prevent color mixing and maintain the intended shadow foundation.
Highlight and Shadow
After establishing your solid basecoat foundation, strategic highlight and shadow placement transforms flat painted surfaces into convincing metallic illusions.
You’ll apply successive highlight layers using progressively lighter tones, building from your base color toward nearly white at the brightest reflection points. Proper highlight placement requires visualizing a consistent light source to determine where intense reflections occur on edges and surfaces.
Shadow depth develops through darker base color variations or complementary hues applied in smooth gradients. Paint shadows in recesses and areas turned away from your light source to sculpt form visually.
Use the Flexible Colour Triads system for harmonious color shifts that maintain realistic metallic properties. Control your tonal balance carefully—overly harsh shadows or misplaced highlights break the metallic effect entirely.
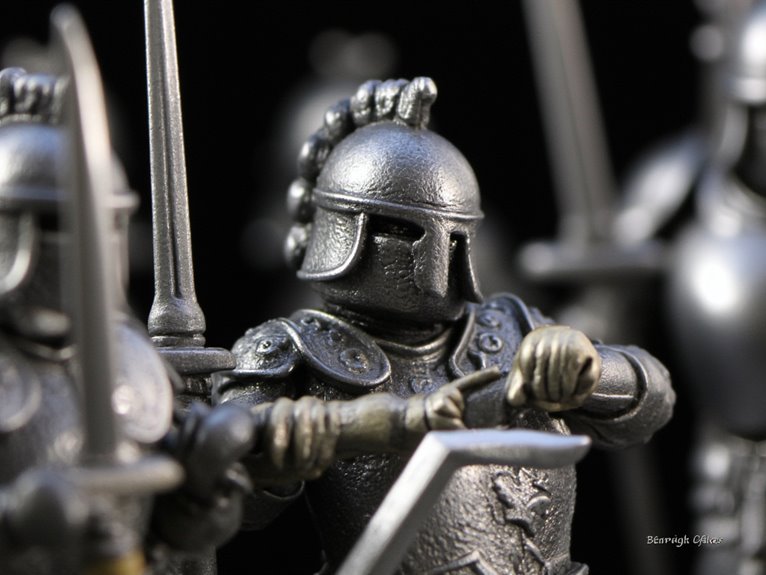
Creating Realistic Steel and Iron Effects
When creating realistic steel and iron effects with non-metallic metal techniques, you’ll need to master the fundamental principle that drives all convincing NMM work: understanding how light behaves on metal surfaces.
Steel requires precise color gradients using blues, greys, and whites to simulate reflective surfaces. Iron demands earthy browns and weathered textures for authentic metal finishes.
Mastering metallic realism depends on choosing the right color palette: cool tones for steel, warm earth tones for iron.
Essential steps for successful NMM techniques include:
- Study light interaction patterns on reference images
- Build shadow placement gradually from dark to light
- Apply color blending smoothly between shifts
- Add texture simulation through glazes and pigments
Strategic reflection positioning mimics natural light behavior. Steel painting styles emphasize clean highlights, while iron incorporates rust effects.
Artistic influences from 2D art provide valuable guidance for advanced techniques.
Once your NMM work is complete, applying a matte finish will reduce glare and maintain the realistic appearance of your painted metal surfaces.
Mastering Gold and Brass Appearances
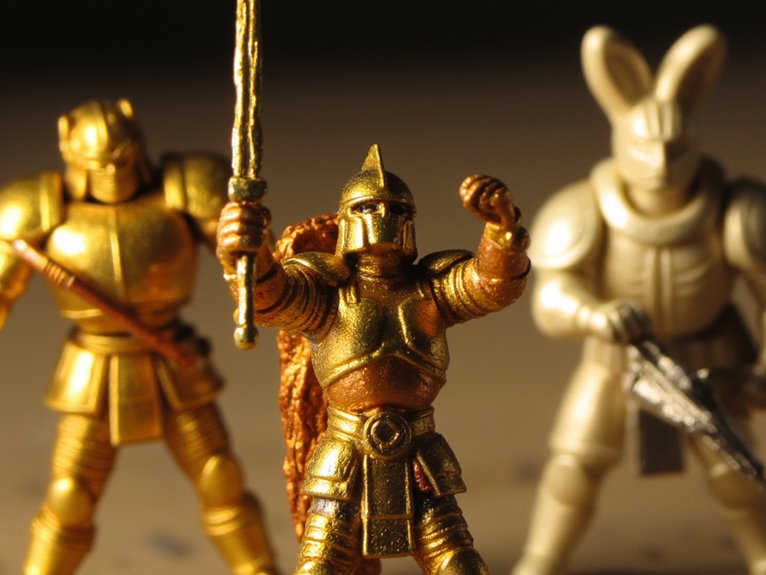
Three fundamental color relationships separate convincing gold and brass NMM from amateur attempts: warm undertones, strategic highlight placement, and controlled contrast distribution.
Your gold layering begins with Carnelian Skin as a reddish-yellow basecoat, establishing essential warmth. Apply Tiger’s Eye Skin highlights using feathered brushstrokes to create metallic grain texture.
Brass requires different treatment. Mix 50/50 Graphite and Runelord Brass for selective highlights on raised surfaces. Focus bright points on edges and corners where light naturally catches metal. Add Lupercal Green glaze for brass patina effects, distinguishing it from pure gold.
Contrast management determines success. Emphasize bright highlights and deep shadows while minimizing midtones—too many flatten the metallic illusion.
Thin washes build gradual shifts without harsh edges. Detail brushes create sharp accent highlights that simulate direct light reflection.
For enhanced realism, consider using heavy-bodied formulations specifically designed for metallic effects, as they typically provide superior coverage and pigmentation without requiring multiple coats.
Advanced Shading and Highlighting Strategies
While mastering gold and brass provides essential foundation skills, advanced NMM demands sophisticated understanding of light physics and reflection patterns that separate professional-quality work from basic attempts.
Your layering techniques must incorporate multiple glazing passes to achieve smooth color shifts between shadows and highlights. Imagine four distinct light sources positioned around your miniature to maintain consistent reflection angles across all surfaces.
Advanced strategies require these core elements:
- High contrast placement – Position bright highlights directly opposite deep shadows along light vectors
- Reflected ambient colors – Add cool tones in shadow areas to simulate environmental light bounce
- Sharp edge definition – Apply pinpoint highlights where metal edges catch maximum light
- Gradient control – Build subtle changes through multiple thin layers rather than stark jumps
Balance large flat highlights with precise glints to replicate natural metal reflectivity patterns effectively. Using a wet palette during these extended layering sessions keeps your carefully mixed colors workable for hours, preventing waste of expensive paints during complex NMM techniques.
Common Mistakes and How to Avoid Them
Despite mastering advanced techniques, painters frequently sabotage their NMM results through five critical errors that transform convincing metal into unconvincing stone or plastic.
The most common pitfall involves incorrect brightness distribution. You’ll achieve effective techniques by concentrating highlights at the spectrum’s bright end while maintaining minimal mid-tones. Very dark shadows paired with brilliant highlights create authentic polished steel effects.
Poor light source planning destroys reflection mapping consistency. Imagine four light points around your miniature to maintain logical highlight placement across all surfaces.
Paint consistency suffers when you apply patchy coverage. Clean, sharp edges simulate actual light reflection on ideal surfaces like armor plates and weapon blades.
Finally, you’re working with three-dimensional objects, not flat paintings. Adapt your approach accordingly, considering how light interacts with volume and geometry for convincing metallic illusions.
Practice Exercises for Skill Development
Understanding these common pitfalls sets the foundation for systematic skill development through targeted practice exercises.
Your NMM progression requires structured practice that builds complexity gradually.
Start with these fundamental exercises:
- Geometric Shape Studies – Paint spheres and cubes using monochrome palettes to master value relationships before adding color complexity.
- Reference Copying – Replicate metallic sections from award-winning miniature competitions to analyze professional techniques systematically.
- Single Component Focus – Practice on isolated elements like sword blades or armor plates before tackling complete figures.
- Light Direction Experiments – Paint identical objects under different light sources to understand highlight placement variations.
Submit your work for art critiques to identify technical weaknesses.
Each exercise builds foundation skills essential for advanced NMM applications.
On a final note
You’ve now mastered NMM’s core principles and techniques. Your brush control determines success more than expensive paints or tools. Practice steel effects first—they’re forgiving and build fundamental skills. Don’t rush the process; proper color shifts require patience and multiple thin layers. Study real metal surfaces under different lighting conditions. Your miniatures will achieve convincing metallic appearances without actual metallic paints once you’ve internalized these systematic approaches.